
Learning how to install WSL (Windows Subsystem for Linux) is the perfect way to unlock a powerful Linux environment directly on your Windows machine without the need for a traditional dual-boot setup.
This guide will walk you through everything you need, from a simple one-line command to a detailed manual setup.
What is WSL? A Quick Explanation
The Windows Subsystem for Linux (WSL) is a feature in Windows that allows you to run a genuine Linux environment—including most command-line tools, utilities, and applications—directly on Windows, unmodified, without the overhead of a full virtual machine.
It’s the best of both worlds for developers, system administrators, and enthusiasts.
Prerequisites: What You Need Before You Start
Before we begin, ensure your system meets the necessary requirements. This will help you avoid common installation issues.
- Windows Version: You must be running Windows 10 version 2004 and higher (Build 19041 and higher) or any version of Windows 11.
- Virtualization: Hardware virtualization must be enabled in your computer’s BIOS/UEFI. Most modern computers have this enabled by default.
The Easy Method: Install WSL with a Single Command
For the vast majority of users, installing WSL is incredibly straightforward. This single command automatically enables the required components, downloads the latest Linux kernel, sets WSL 2 as the default, and installs Ubuntu for you.
- Open PowerShell or Windows Command Prompt as an Administrator. You can do this by searching for “PowerShell” in the Start Menu, right-clicking it, and selecting “Run as administrator.”
- Type the following command and press Enter:
wsl --install
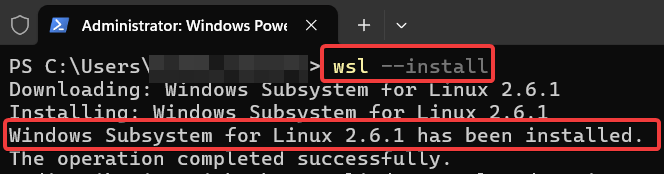
After the process completes, you will need to restart your computer.
Choosing Your Linux Distribution
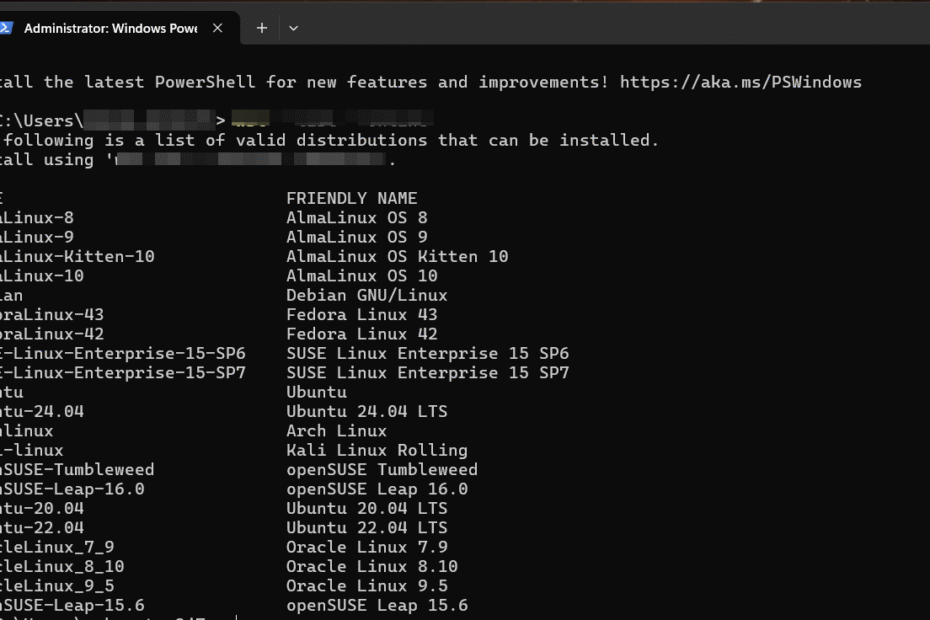
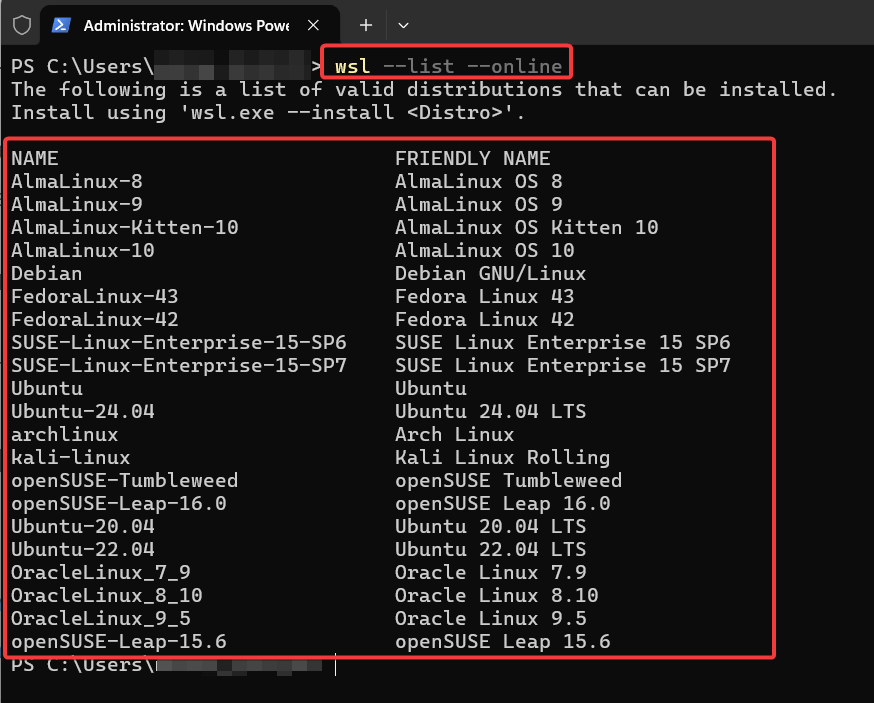
While the default command installs Ubuntu, you have the freedom to choose from many other popular Linux distributions.
To see a list of available options, open PowerShell and run:
wsl --list --online
Once you see a distribution you’d like to install (e.g., Debian), you can install it specifically using this command:
wsl --install Debian
Replace Debian with your chosen distribution’s name from the list.
Then, the download and installation will start. Once completed, it will ask you to set username and password.
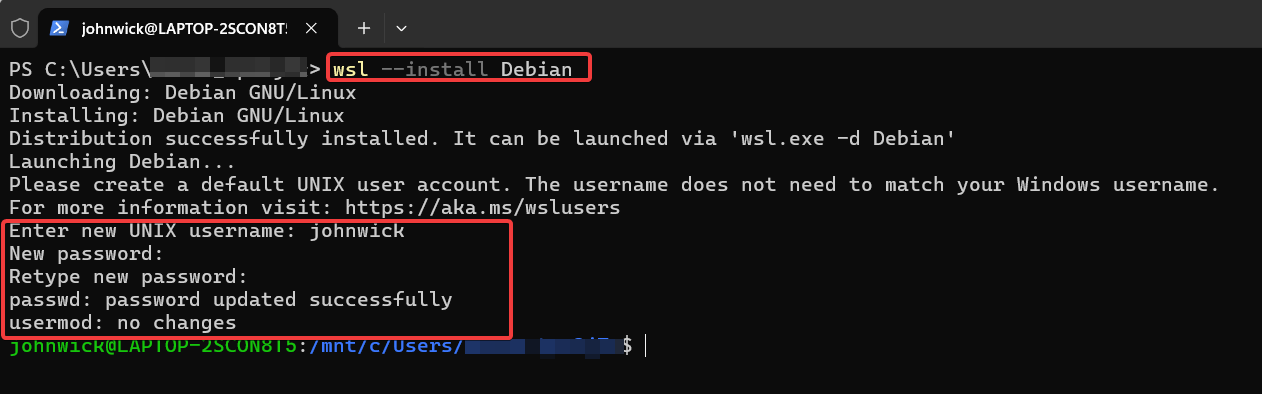
Voila! Now, you can start to use the WSL.
The Manual Method: A Step-by-Step Installation Guide
If the simple command doesn’t work, or if you want more control over the installation process, you can follow these manual steps. This method ensures every necessary component is enabled correctly.
Step 1: Enable the Windows Subsystem for Linux Feature
First, you need to enable the core WSL optional feature. Open PowerShell as Administrator and run the following command:
dism.exe /online /enable-feature /featurename:Microsoft-Windows-Subsystem-Linux /all /norestart
Step 2: Enable the Virtual Machine Platform
Next, for WSL 2, you must enable the Virtual Machine Platform. This component is crucial for the performance and functionality of WSL 2. In the same administrator PowerShell window, run this command:
dism.exe /online /enable-feature /featurename:VirtualMachinePlatform /all /norestart
After this step, restart your computer to apply the changes.
Step 3: Download and Install the Linux Kernel Update Package
WSL 2 requires a manual kernel update. Download the latest package directly from Microsoft’s documentation.
- Download the WSL2 Linux kernel update package for x64 machines (External Link to Microsoft Docs)
Run the downloaded installer. It’s a quick, straightforward installation—just follow the on-screen prompts.
Step 4: Set WSL 2 as Your Default Version
With the kernel installed, you can now set WSL 2 as the default version for any new Linux distributions you install. In PowerShell, run: code Bashdownloadcontent_copyexpand_less
wsl --set-default-version 2
Step 5: Install Your Chosen Linux Distribution
Finally, you can install a Linux distribution from the Microsoft Store. Open the Microsoft Store and search for your preferred distribution. Ubuntu is a popular choice and is officially supported.
- Get Ubuntu from the Microsoft Store (External Link to Microsoft Store)
Click “Get” or “Install” on the distribution’s page. Once installed, launch it from the Start Menu to complete the setup and create your user account.
Post-Installation: Setting Up Your Linux Environment
Once your Linux distribution is running, it’s a best practice to update its package lists and upgrade any outdated packages. Open your new Linux terminal and run these two commands, one after the other: code Bashdownloadcontent_copyexpand_less
sudo apt update
sudo apt upgrade
Integrating WSL with VS Code (A Real-World Example)
One of the most powerful uses of WSL is its seamless integration with Visual Studio Code, a leading code editor. This allows you to write code in Windows while running, debugging, and testing it in a Linux environment.
- Install Visual Studio Code on your Windows machine.
- Open VS Code and navigate to the Extensions view (Ctrl+Shift+X).
- Search for and install the official “WSL” extension published by Microsoft.
- Once installed, you can open your WSL project by simply opening the Linux terminal and typing:
code .
This command opens a new VS Code window connected directly to your Linux environment, allowing you to edit files as if they were local.
Pro-Tips for a Better WSL Experience
To get the most out of WSL, keep these expert tips in mind.
Keep Your Project Files in the Linux Filesystem
For maximum performance, you should always store your project files inside the Linux environment (e.g., in /home/your_username/projects).
WSL 2 offers blazing-fast file I/O within its native ext4 filesystem. Accessing files across the OS boundary on your mounted Windows drives (e.g., /mnt/c/) will be noticeably slower for operations like git status or package installs.
Understanding WSL Networking
Any network service you run inside WSL is automatically accessible from your Windows host machine on localhost.
For example, if you run a Node.js web server on port 3000 inside your Ubuntu terminal, you can immediately open your Windows Chrome browser and navigate to http://localhost:3000 to see it.
Enhanced WSL Commands You Should Know
Here is a more comprehensive reference table of useful commands to manage your WSL environment from PowerShell:
| Command | Description |
|---|---|
| wsl -l -v | Lists all installed Linux distributions and their WSL version. |
| wsl –update | Updates the WSL Linux kernel to the latest version. |
| wsl –shutdown | Immediately terminates all running distributions and the WSL 2 VM. |
| wsl –set-version <distro> <version> | Converts a specific distribution between WSL 1 and WSL 2. |
| wsl –unregister <distro> | Deletes a distribution, including all its files. Use with caution! |
| wsl –setdefault <distro> | Sets the default Linux distribution that runs when you type wsl. |
Managing Your WSL Distributions: Backup and Restore
Once you’ve configured your environment, you can save it as a backup or move it to another machine.
- To back up (export) your distribution: Open PowerShell and run the following command. This will create a tar file containing your entire Linux environment
wsl --export Ubuntu-20.04 "D:\WSL-Backups\ubuntu_backup.tar"
- To restore (import) your distribution: You can import the backup to a new location with a new name.
wsl --import MyCustomUbuntu "D:\WSL-Distros\MyCustomUbuntu" "D:\WSL-Backups\ubuntu_backup.tar"
Troubleshooting Common WSL Installation Errors
If you encounter an issue, don’t worry. Here are solutions to some of the most common problems.
- Error: “Please enable the Virtual Machine Platform…” or Error Code 0x80370102
This is the most frequent issue and means hardware virtualization is not enabled. You must restart your computer and enter the BIOS/UEFI settings. Look for an option called “Intel VT-x,” “Intel Virtualization Technology,” “AMD-V,” or “SVM Mode” and ensure it is Enabled. - Installation hangs or fails with an obscure error code.
Sometimes, other Windows features can interfere. Ensure that the “Windows Hypervisor Platform” is also enabled. You can do this by running the following command in an administrator PowerShell:
dism.exe /online /enable-feature /featurename:HypervisorPlatform /all /norestart
Frequently Asked Questions (FAQ)
A: Your local drives are automatically mounted inside the Linux environment under the /mnt/ directory. For example, your C: drive is accessible at /mnt/c/.
A: Yes! With WSLg (Windows Subsystem for Linux GUI), which is included in Windows 11, you can run Linux GUI apps out-of-the-box. Just install them inside your Linux environment and run them from the terminal.
A: You can set your default distribution by using the command wsl –setdefault <DistributionName> in PowerShell, replacing <DistributionName> with the name you see when you run wsl -l -v.
Conclusion
You now have a complete understanding of how to install WSL (Windows Subsystem for Linux).
Whether you used the simple one-line command for a quick setup or the detailed manual method for more control, you have successfully integrated a powerful Linux environment into your Windows workflow.
This opens up a new world of development tools and command-line utilities.
We hope this guide was helpful. Share it with others who might benefit, and let us know in the comments if you have any questions.
IT Security / Cyber Security Experts.
Technology Enthusiasm.
Love to read, test and write about IT, Cyber Security and Technology.
The Geek coming from the things I love and how I look.