
Struggling to install pending windows updates easily windows systems often present? Seeing that “Pending install” or “Pending download” message for hours is incredibly frustrating, but don’t worry—you have the power to fix it.
This guide provides a clear, step-by-step walkthrough to resolve this common issue.
- Key Takeaways: Fixing Pending Windows Updates
- A Quick Word of Caution: Back Up Your Data
- Why Do Windows Updates Get Stuck?
- Before You Start: The Two Quickest Checks
- How to Install Pending Windows Updates Easily Windows 11 & 10
- Method 1: Restart Your Computer
- Method 2: Run the Built-in Windows Update Troubleshooter
- Method 3: Restart Windows Update services
- Method 4: Clear the Windows Update Cache (SoftwareDistribution Folder)
- Method 5: Repair System Files with SFC and DISM Commands
- Method 6: Manually Reset Critical Windows Update Components
- Method 7: Download and Install the Update Manually
- Pro-Tips: How to Prevent Updates from Getting Stuck
- Frequently Asked Questions (FAQ)
- Conclusion
Key Takeaways: Fixing Pending Windows Updates
- Start Simple: Before trying complex solutions, always perform the two easiest checks: ensure your internet connection is stable and restart your computer.
- Use Built-in Tools First: The Windows Update Troubleshooter is a powerful, automated tool designed by Microsoft to find and fix common update issues safely.
- Clearing the Cache is Highly Effective: A primary cause of stuck updates is corrupted download files. Stopping the update services and clearing the contents of the C:\Windows\SoftwareDistribution\Download folder forces a fresh start.
- Repair System Files for Deeper Issues: If the problem persists, use the sfc /scannow and DISM /Online /Cleanup-Image /RestoreHealth commands in the Command Prompt to repair core Windows files.
- When All Else Fails, Go Manual: You can bypass the automatic update system by identifying the update’s KB number and downloading it directly from the Microsoft Update Catalog.
- Prevention and Safety are Crucial: Always back up your data before making system changes and help prevent future issues by ensuring you have adequate disk space and a stable internet connection during updates.
A Quick Word of Caution: Back Up Your Data
Before you attempt any of the more advanced solutions (especially those involving the Command Prompt), it is highly recommended that you back up your important files.
While these methods are generally safe, creating a backup provides a safety net against accidental data loss. You can use a cloud service or an external hard drive. For a complete guide, refer to Microsoft’s official article on how to back up your Windows PC.
Why Do Windows Updates Get Stuck?
Understanding the cause can help you fix the problem faster. Typically, a “pending install” error happens for one of these reasons:
- Corrupted Download Files: The files downloaded for the update may have been damaged during the download process.
- Server or Network Issues: A slow or intermittent internet connection can interrupt communication with Microsoft’s update servers.
- Software Conflicts: Another program or an existing system process might be interfering with the Windows Update service.
- System File Errors: Core files within your Windows installation itself may be corrupted, preventing new updates from being applied correctly.
Our guide will address each of these potential causes.
Before You Start: The Two Quickest Checks
Before diving into more complex solutions, let’s get the simplest potential fixes out of the way. These two steps resolve the issue more often than you might think.
- 1. Check Your Internet Connection: A weak or unstable internet connection can interrupt the download process, causing it to hang. First, ensure you are connected and try loading a new web page to confirm your connection is active.
- 2. Restart Your PC: The age-old advice of “turning it off and on again” is a classic for a reason. A simple restart can terminate stuck processes and services that are interfering with the update, allowing it to proceed normally upon reboot.
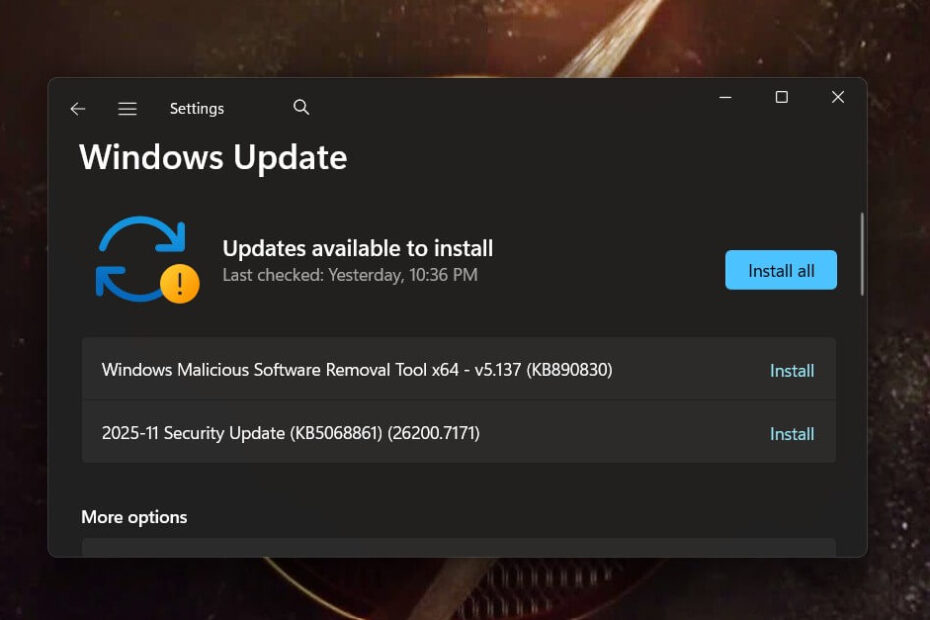
How to Install Pending Windows Updates Easily Windows 11 & 10
If updates are stuck at “Pending install” or “Pending download,” try these troubleshooting steps.
Method 1: Restart Your Computer
By restarting your computer, it will re-attempt to re-download or re-install pending update.
If it does not automatically download or install it for you, try to download or update manually.
Method 2: Run the Built-in Windows Update Troubleshooter
Your Windows operating system includes a dedicated tool designed to diagnose and automatically fix problems related to updates. Therefore, this should be your first active step.
- Open Windows Settings. You can do this by pressing the Windows key + I on your keyboard.
- Navigate to the Troubleshooter.
- On Windows 11: Go to System > Troubleshoot > Other troubleshooters.
- On Windows 10: Go to Update & Security > Troubleshoot > Additional troubleshooters.
- Run the Troubleshooter. Find Windows Update in the list and click the Run button next to it.
- Follow the Prompts. The tool will scan for issues. If it finds any, it will either fix them automatically or provide instructions. Afterward, restart your PC and check for updates again.
Method 3: Restart Windows Update services
Sometimes, the services can get stuck. You need to restart the services:
- Open Services (search “services.msc“).
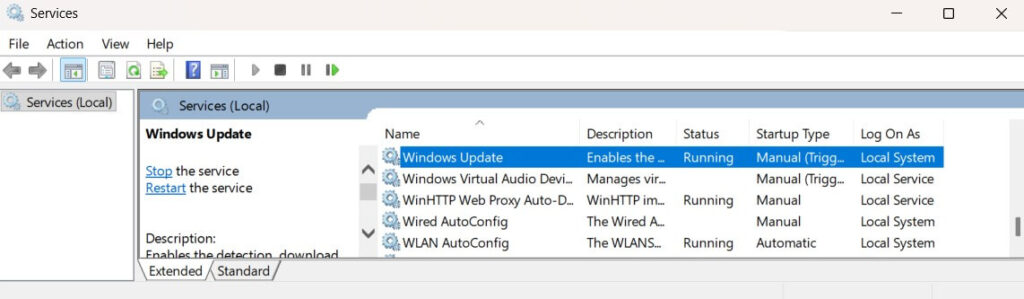
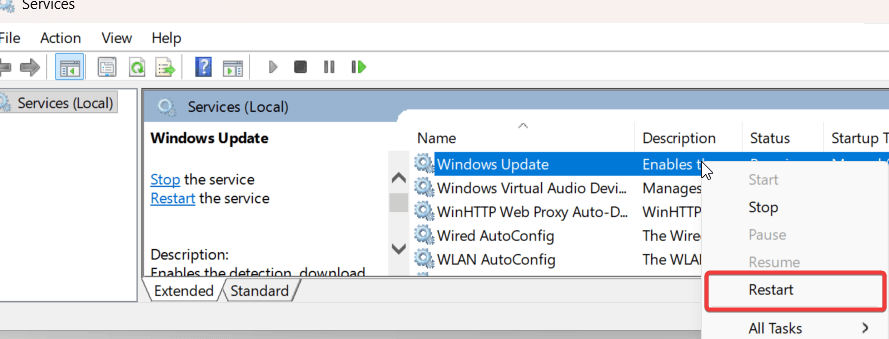
- Find “Windows Update,” right-click and select Restart.
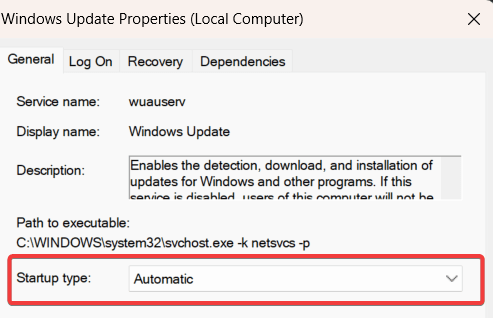
- Right-click on “Windows Update”, then click Properties.
- Set startup type to Automatic.
Method 4: Clear the Windows Update Cache (SoftwareDistribution Folder)
Sometimes, the files downloaded for the update become corrupted, preventing the installation from proceeding. The solution is to clear this cache, forcing Windows to download fresh, uncorrupted files.
Note: This process is safe and will not delete any of your personal files. It only removes temporary update installation files.
- Open Command Prompt as an Administrator. Search for “cmd” in the Start Menu, right-click on Command Prompt, and select “Run as administrator.”
- Stop the Update Services. You need to stop the services that use these files before you can delete them. Type the following commands one by one, pressing Enter after each command:
net stop wuauservnet stop cryptSvcnet stop bits net stop msiserver
- Navigate to the SoftwareDistribution Folder. Open File Explorer and go to C:\Windows\SoftwareDistribution.
- Delete the Cache Contents. Open the Download folder located inside SoftwareDistribution, select all files and folders within it (Ctrl + A), and press the Delete key.
- Restart the Update Services. Go back to the Administrator Command Prompt and type the following commands, pressing Enter after each, to turn the services back on:
net start wuauservnet start cryptSvcnet start bitsnet start msiserver
Finally, restart your computer and try running Windows Update again.
Method 5: Repair System Files with SFC and DISM Commands
If the issue is caused by underlying corruption within your core Windows system files, the System File Checker (SFC) and DISM (Deployment Image Servicing and Management) tools are your best bet.
- Open Command Prompt as an Administrator as you did in the previous method.
- Run the SFC Scan. This tool will scan for and attempt to repair corrupt Windows system files. Type the following command and press Enter:codeBatch
sfc /scannowWait for the process to complete. It may take some time. For more information on this tool, you can refer to Microsoft’s official System File Checker documentation. - Run the DISM Tool. DISM is a more powerful tool that can repair the core Windows system image. After the SFC scan is finished, run the following command:codeBatch
DISM /Online /Cleanup-Image /RestoreHealth
Once both scans are complete, restart your computer. This combination often resolves deep-seated issues that prevent you from being able to install pending windows updates easily windows would otherwise not allow.
Method 6: Manually Reset Critical Windows Update Components
This is a more advanced version of clearing the cache. It involves renaming key folders in addition to stopping services, which forces Windows to completely rebuild the update components.
- Open Command Prompt as an Administrator and stop the update services as shown in Method 2.
- Rename the Key Folders. These folders store update configurations. Renaming them serves as a backup and forces Windows to create fresh ones. Execute the following commands:
ren C:\Windows\SoftwareDistribution SoftwareDistribution.oldren C:\Windows\System32\catroot2 catroot2.old
- Restart the Update Services using the net start commands from Method 2.
- Reboot your PC and check for updates.
Method 7: Download and Install the Update Manually
If all else fails, you can bypass the automatic update system entirely. What do you do if a specific update just won’t install? You can download it directly from the Microsoft Update Catalog.
- Find the Update KB Number. Go to Settings > Update & Security > View update history to find the knowledge base (KB) number of the failing update (e.g., KB5034123).
- Search the Catalog. Go to the Microsoft Update Catalog website and search for that exact KB number.
- Download and Install. Find the version that matches your system architecture (usually x64 for modern PCs), download it, and run the installer file just like any other program.
Pro-Tips: How to Prevent Updates from Getting Stuck
To avoid this problem in the future, follow these best practices:
- Ensure a Stable Connection: Always download major updates on a reliable Wi-Fi or wired connection.
- Free Up Disk Space: Make sure you have at least 10-20 GB of free space on your main C: drive before starting a major update.
- Be Patient: Large feature updates can take time. Don’t shut down your computer forcefully in the middle of the “Working on updates” screen unless it has been frozen for several hours.
- Update Regularly: Installing smaller, regular updates is often smoother than installing several months’ worth at once.
Frequently Asked Questions (FAQ)
An update can get stuck for several reasons, including a poor internet connection, corrupted downloaded files, a lack of disk space, or conflicting software. The methods above address the most common causes.
While you can’t simply “cancel” it from the settings screen, you can use the methods above (like stopping the services and clearing the cache) to safely halt the stuck process and restart it cleanly.
Minor updates might take only a few minutes, while major feature updates can take 30-90 minutes or more, depending on your internet speed and your computer’s hardware. If it’s been stuck for several hours, it’s time to intervene.
Conclusion
Facing a stuck update is disruptive, but with the right approach, it’s a solvable problem. By following these methods—from a simple restart to a manual download—you can regain control over your system and successfully install your updates. We hope this guide has made the process to install pending windows updates easily windows users deserve.
If this article helped you, consider sharing it with someone else who might be facing the same issue, or leave a comment below with your experience.
IT Security / Cyber Security Experts.
Technology Enthusiasm.
Love to read, test and write about IT, Cyber Security and Technology.
The Geek coming from the things I love and how I look.