
Is Microsoft Edge acting sluggish? Are websites not loading correctly, showing outdated information, or just behaving strangely? Often, a cluttered browser cache is the culprit. Don’t worry, clearing your cache in Edge is a quick and easy fix that can significantly improve your browsing experience. This guide will show you exactly how to do it, explain why it’s beneficial, and provide some extra tips.
Why Clear Your Microsoft Edge Cache?
Clearing the cache in your Microsoft Edge browser offers several benefits:
- Improve Speed: Your internet browser stores files to load sites you visit faster. Over time, this browser cache can become bloated. Clearing the cache removes these old files, helping your web browser perform faster.
- Fix Website Loading Errors: If a website isn’t loading correctly or displays outdated information, an old cache may be the culprit. Clearing cache and cookies ensures you refresh the page and see the most current version. This is excellent troubleshooting for internet browsing.
- Free Up Disk Space: The cached images and files are stored on your device and can take up valuable space. Delete them to reclaim it.
- Enhance Privacy (Partially): Clearing your cache removes stored website components. For more comprehensive privacy, you should also clear browsing history and cookies and other site data, including cookies from a web browser.
Even issues like Edge crashing can sometimes be fixed when you clear the cache.
How to Clear Cache in Edge Browser
Step-by-Step: Clearing the Cache in Microsoft Edge (Desktop)
Follow these simple instructions to clear your Microsoft Edge cache on your Windows computer or Apple computer:
- Open Microsoft Edge: Launch the Microsoft Edge browser.
- Access Settings: Click the three horizontal dots (…) menu icon in the upper-right corner of the browser window.
- Select ‘Settings’: Choose Settings from the dropdown menu.
- Navigate to Privacy Settings: In the Settings menu, click on Privacy, search, and services in the left-hand sidebar.
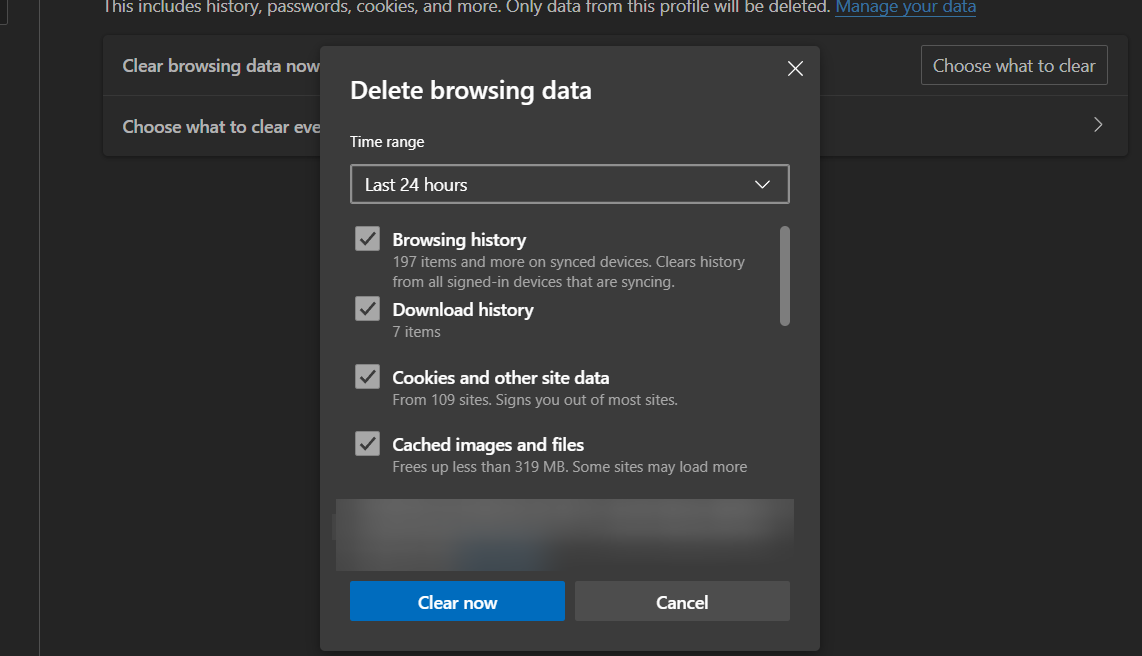
- Find ‘Clear browsing data’: Scroll down to the Clear browsing data section. Click the button labeled Choose what to clear.
- Select Time Range: A pop-up window will appear. From the Time range dropdown menu, select the period for which you want to clear data. Options include ‘Last hour’, ‘Last 24 hours’, ‘Last 7 days’, ‘Last 4 weeks’, and ‘All time’. For troubleshooting, ‘All time’ is often best.
- Choose ‘Cached images and files’: Ensure you select the checkbox next to Cached images and files. This is the primary option to clear cache.
- Optional: You can also select other items like Browsing history, Download history, or Cookies and other site data if you wish to clear those as well. Be aware that clearing cookies will log you out of most websites and may remove saved passwords if not managed separately.
- Clear the Data: Click the Clear now button.

Microsoft Edge will then delete the selected Edge browsing data, including the cache.
Step-by-Step: Clearing Cache in Microsoft Edge Mobile (Android & iOS)
Need to clear the cache on your Android device or iOS device (like an iPhone)? The process is just as simple:
- Open the Edge App: Launch the Microsoft Edge browser on your Android or iOS device.
- Access the Menu: Tap the three horizontal line menu button (often at the bottom center).
- Open Settings: Tap the ‘Settings’ icon (often a gear).
- Navigate to Privacy: Tap on ‘Privacy and security’.
- Select ‘Clear browsing data’: Tap this option. (On iOS, this might be labeled ‘Clear history and website data’).
- Choose What to Clear:
- Ensure you select ‘Cached images and files’.
- Deselect other items like ‘Browsing history’ or ‘Cookies and site data’ if you only want to clear the cache.
- Note: Mobile Edge might not always offer a Time range option like the desktop version; it often clears all selected data stored.
- Confirm Clearing: Tap the ‘Clear data’ or ‘Clear now’ button. Confirm if prompted.
Your mobile Microsoft Edge cache is now cleared!
Quick Access: Clear Cache with a Keyboard Shortcut
For even faster access to clear browsing data on your desktop:
- Press Ctrl + Shift + Delete (on a Windows computer)
- Press Cmd + Shift + Delete (on an Apple computer)
This shortcut directly opens the ‘Clear browsing data’ pop-up, allowing you to quickly clear your cache in Edge.
What’s the Difference? Cache vs. Cookies vs. History
Understanding these helps you decide what you want to clear:
- Cache (Cached images and files): Your internet browser stores parts of websites (images, scripts) locally. This makes pages load faster the next time you visit. Clearing your cache forces the web browser to download fresh content, fixing display issues.
- Cookies (Cookies and other site data): Small files websites store on your computer. They remember your preferences, login status (so you don’t have to enter your password every time), and track activity across sites you visit.
Clearing cookies logs you out and resets site-specific preferences. You often perform clearing cache and cookies together. - History (Browsing history): A list of websites you’ve visited. Clear your browsing history to remove this record.
Automatically Clear Cache in Microsoft Edge
You can also configure Microsoft Edge for Windows (and other platforms) to automatically delete your cache and other browsing data when you close the browser:
- Go to “Settings” > “Privacy, search, and services”.
- Scroll to “Clear browsing data”.
- Click on Choose what to clear every time you close the browser.
- Toggle on the switch for Cached images and files and any other data types (like Cookies and other site data) you want to automatically clear.
This helps maintain performance and privacy without manual intervention, though it means some data stored for faster loading won’t be available when you next open your browser.
Read also: Best ways to customize Microsoft Edge homepage
Wrap Up
Clearing your Microsoft Edge cache is a straightforward way to keep your web browser running smoothly.
Whether you need to clear the cache, cookies, or your entire browsing history, these steps will help you manage your Edge browsing data effectively across all your synced devices.
This process is distinct from clearing cache in other browsers like Google Chrome, Safari, or the older Internet Explorer, though the principles are similar.
Regularly clearing your browser cache ensures your web browser is an important tool that works efficiently for you.
IT Security / Cyber Security Experts.
Technology Enthusiasm.
Love to read, test and write about IT, Cyber Security and Technology.
The Geek coming from the things I love and how I look.