
Running out of space or just need better organization? Learning how to create and format hard disk partitions can transform your digital life.
This guide will walk you through splitting your drive into manageable sections, making your PC more efficient and secure, step by step.
- Why Should You Partition Your Hard Drive? The Key Benefits
- Understanding the Partitions You Already Have
- Before You Begin: The Single Most Important Step
- Method 1: Using Disk Management (The Easiest Method for Most Users)
- Method 2: Using the Command Prompt (DiskPart) for Advanced Users
- Method 3: Using Third-Party Partitioning Software
- Best Practices for Your New Partition
- Advanced Tasks and Troubleshooting
- Frequently Asked Questions (FAQs)
Why Should You Partition Your Hard Drive? The Key Benefits
Before diving into the “how,” let’s quickly cover the “why.” Creating partitions is more than just an organizational trick; it offers practical advantages:
- Data Safety: By keeping your operating system (OS) on one partition (C:) and personal files on another (D:), you can reinstall Windows on the C: drive without wiping your important documents, photos, and other data.
- Easier Backups: You can create a smaller, faster backup (an “image”) of just your OS partition.
- Improved Organization: Dedicate different partitions for specific purposes, such as “Games,” “Work Files,” or “Media,” for a clutter-free system.
- Install Multiple Operating Systems (Dual-Booting): If you want to run Windows and Linux on the same computer, you need a separate partition for each operating system.
Understanding the Partitions You Already Have
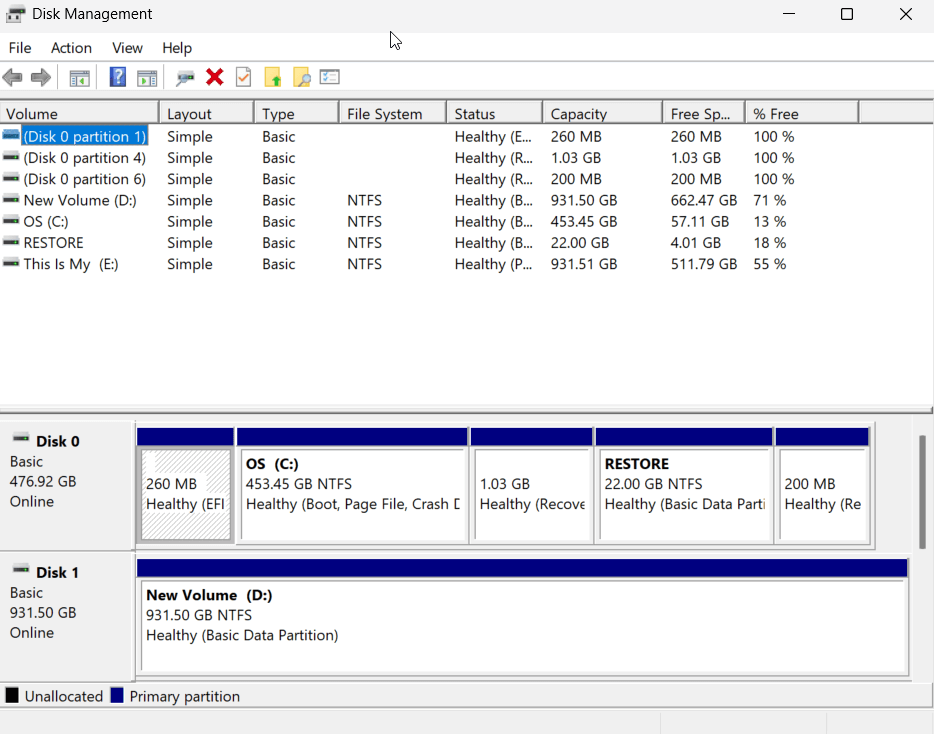
When you open Disk Management, you’ll see more than just your C: drive. You’ll likely see small, unnamed partitions. It is vital to understand what these are.
- EFI System Partition: A small partition (around 100MB) that is critical for booting Windows on modern computers. Never touch, delete, or modify this partition.
- Recovery Partition: This contains the necessary files to boot into the Windows Recovery Environment to troubleshoot problems. You should also leave this partition alone.
Your goal is to shrink your main Primary Partition (usually C:), which is where Windows and your files are stored.
Before You Begin: The Single Most Important Step
Before making any changes to your hard drive, it is absolutely critical that you back up your data. Partitioning is generally safe, but errors can happen, and the risk of data loss is real.
- Action: Create a full backup of your system. You can use Windows’ built-in backup tools or a third-party application. Ensure your important files—documents, photos, and videos—are stored safely on an external hard drive or a cloud service.
Think of this as your safety net. Once you have a secure backup, you can proceed with confidence.
Method 1: Using Disk Management (The Easiest Method for Most Users)
For the vast majority of users, the built-in Disk Management tool is the perfect way to partition a drive. It has a graphical interface that makes the process straightforward and visual.
Step 1: Open the Disk Management Tool
First, you need to open the tool itself. The quickest way to do this is:
- Press the Windows Key + X on your keyboard.
- Select “Disk Management” from the menu that appears.
You will now see a window that displays all the drives connected to your computer.
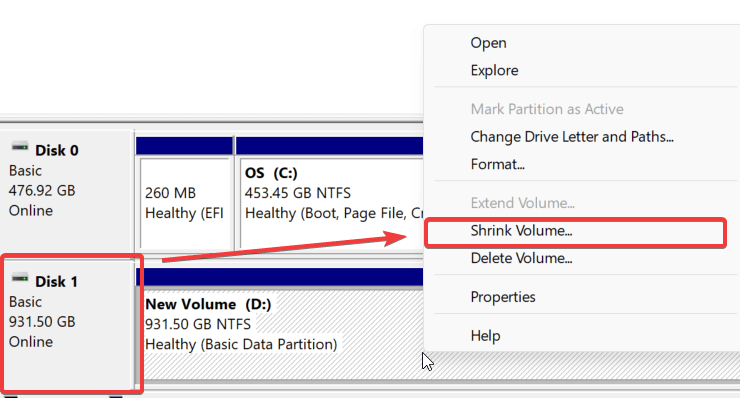
Step 2: Create Unallocated Space by Shrinking a Volume
To create a new partition, you first need some empty, unallocated space. You can create this by shrinking your existing main drive (usually the C: drive).
- Right-click on the drive you want to shrink (e.g., D:).
- Select “Shrink Volume…” from the context menu.
- A new window will pop up. In the field that says, “Enter the amount of space to shrink in MB,” type in how large you want your new partition to be. For example, to create a 100 GB partition, you would enter 102400 (100 x 1024).
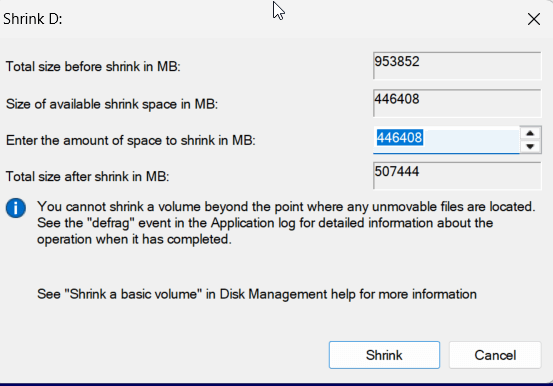
- Click the “Shrink” button.
After a moment, you will see a new block of “Unallocated” space appear in the Disk Management window.
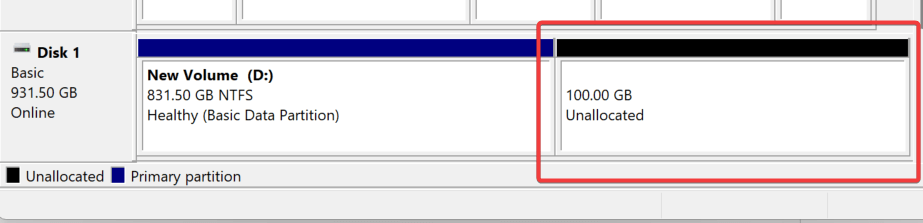
Step 3: Create a New Partition (Simple Volume)
Now that you have free space, it’s time to turn it into a usable partition.
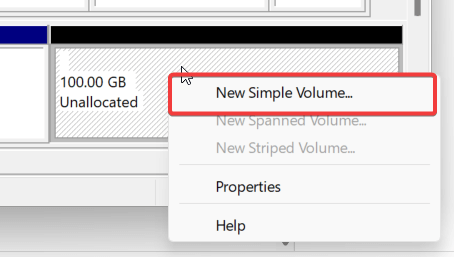
- Right-click on the “Unallocated” space.
- Select “New Simple Volume…” This will launch the New Simple Volume Wizard.
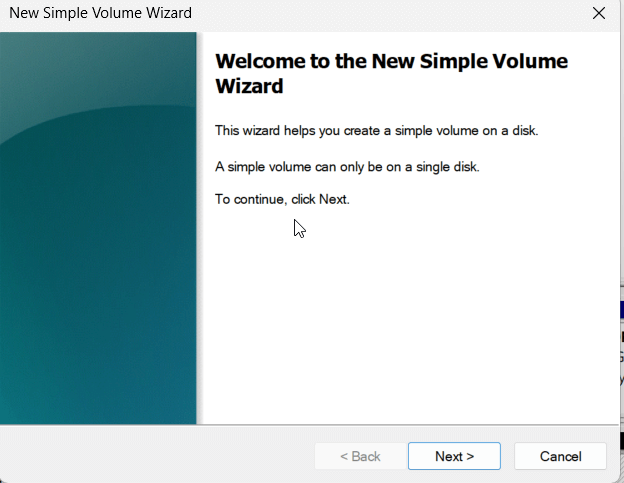
- Click “Next” on the first screen.
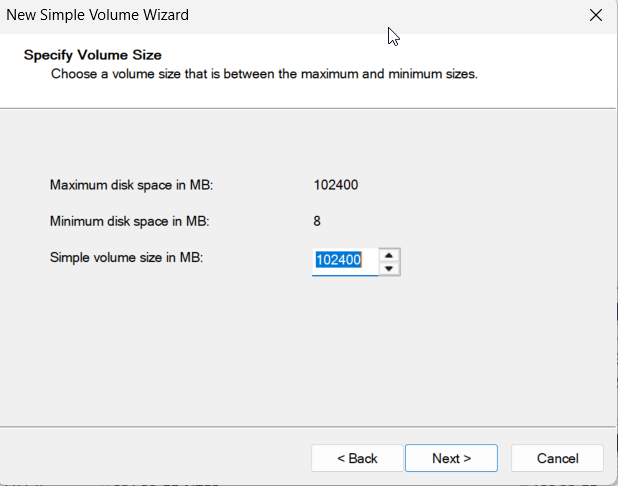
- The wizard will ask you to specify the volume size. By default, it uses all the unallocated space. Leave it as is to use the entire space you just created, then click “Next”.
Step 4: Assign a Drive Letter and Format the Partition
Next, you will give your new partition a drive letter and format it so Windows can use it.
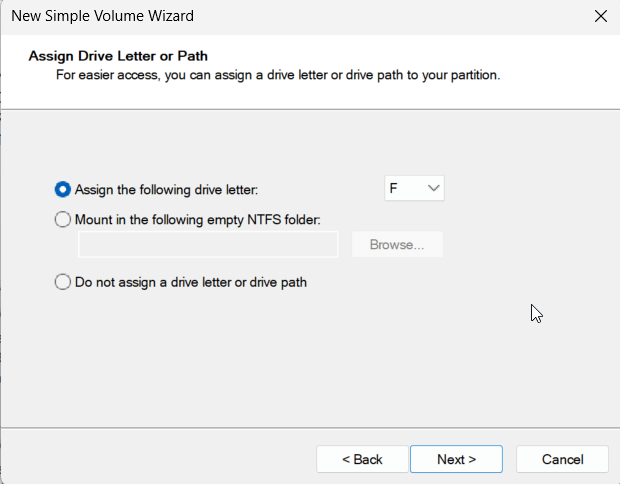
- On the “Assign Drive Letter or Path” screen, select a drive letter from the dropdown menu (e.g., E: or F:). Click “Next”.
- You will now see the “Format Partition” screen. Here are the most important settings:
- File system: Choose NTFS. This is the modern standard for Windows.
- Volume label: Give your partition a descriptive name, like “Data” or “Games.”
- Perform a quick format: Make sure this box is checked.
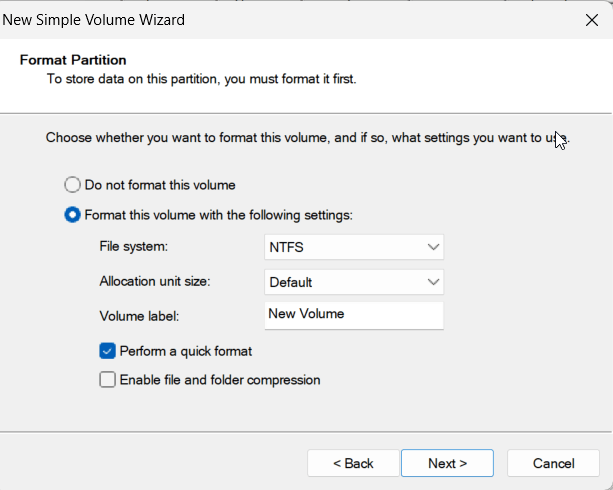
- Click “Next”, and then “Finish” to complete the process.
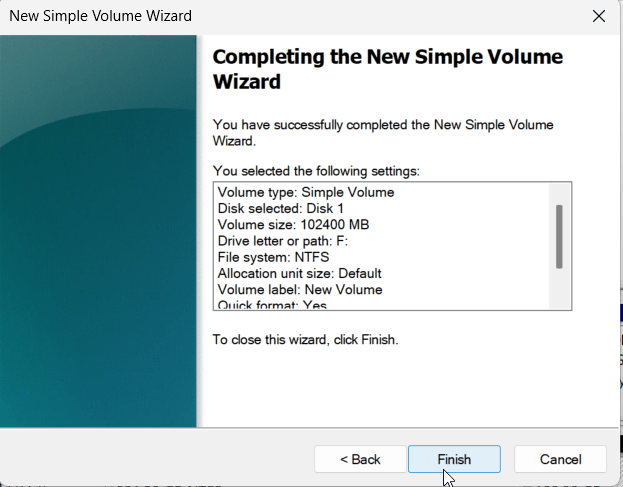
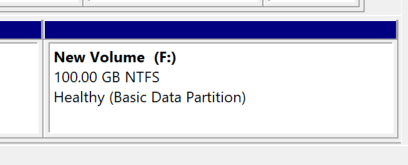
You’ve successfully learned how to create and format hard disk partitions! Your new drive will now appear in File Explorer, ready to use.\
Method 2: Using the Command Prompt (DiskPart) for Advanced Users
If you prefer using the command line or need to partition a drive from a recovery environment, the DiskPart utility is an incredibly powerful tool. Warning: This method is for advanced users. Be extremely careful to select the correct disk, as mistakes can lead to data loss.
- Open Command Prompt as an Administrator. Search for “cmd” in the Start Menu, right-click it, and select “Run as administrator.”
- Type diskpart and press Enter.
- Use the following commands in sequence, pressing Enter after each one. The text after # explains the command.
# Enters the DiskPart utility
diskpart
# Lists all physical disks connected to your PC
list disk
# IMPORTANT: Select the disk you want to partition. Replace ‘0’ with your disk number.
select disk 0
# Creates a new primary partition using 102400 MB (100 GB) of space.
create partition primary size=102400
# Formats the new partition with the NTFS file system, quickly.
format fs=ntfs quick
# Assigns the next available drive letter.
assign
# Exits DiskPart
exit
This method is faster for those comfortable with commands and offers more granular control. For more detailed information on this tool, refer to the official Microsoft Learn DiskPart documentation.
Method 3: Using Third-Party Partitioning Software
While Windows’ built-in tools are powerful, sometimes you need more flexibility. Third-party applications like EaseUS Partition Master or MiniTool Partition Wizard offer advanced features, such as:
- Resizing or moving existing partitions without deleting them.
- Merging two partitions into one.
- More user-friendly interfaces.
These tools can be a great option if you find the Windows tools too restrictive, but for most basic tasks of creating and formatting, Disk Management is all you need.
Best Practices for Your New Partition
Creating the partition is just the first step. To get the most out of it, follow these best practices:
- Move Your User Folders: Relocate your personal folders (Documents, Downloads, Pictures, Music, Videos) to the new partition. To do this, right-click a folder like “Documents,” select Properties, go to the Location tab, and click Move… to select a new folder on your new drive. This keeps your personal files separate from the OS.
- Install Large Programs and Games: When installing new software or games, choose the “Custom Install” option and set the installation path to a folder on your new partition to save space on your C: drive.
- SSD vs. HDD: Does Partitioning Matter for Performance?
- On a traditional Hard Disk Drive (HDD), partitioning could sometimes offer a minor speed boost by keeping the OS on the faster, outer part of the disk platter.
- On a modern Solid-State Drive (SSD), there is no performance benefit to partitioning, as all parts of the drive are accessed at the same speed. For SSDs, the benefits of partitioning are purely for organization and data safety.
Advanced Tasks and Troubleshooting
Here’s how to handle common issues and related tasks.
Problem: The “Shrink Volume” Option is Greyed Out or You Can’t Shrink Enough
This usually happens because there are “unmovable” system files located at the very end of the volume. These can include the page file, hibernation files, or system protection files. Windows can’t move them, so it can’t shrink the volume past them.
- Solution: Temporarily disable these features. Go to System Properties > Advanced > Performance Settings > Advanced > Change, and disable the page file. You can also temporarily disable System Restore. After partitioning, be sure to re-enable them.
How to Safely Delete a Partition and Reclaim Space
If you no longer need a partition, you can delete it and merge the space back into your main drive.
Warning: This action will permanently erase all data on the partition you are deleting.
- In Disk Management, right-click the partition you want to remove and select “Delete Volume…”. Confirm the warning.
- The space will now be marked as “Unallocated”.
- Right-click the partition next to the unallocated space (usually your C: drive) and select “Extend Volume…”.
- Follow the wizard to add all the unallocated space back to your main partition.
Frequently Asked Questions (FAQs)
Q: What is the main benefit of partitioning a hard drive?
A: The primary benefits are organization and safety. You can keep your operating system files on one partition (C:) and your personal data (documents, games, photos) on another (D:). This way, if you ever need to reinstall Windows, you can wipe the C: drive without touching your personal files.
Q: Can I partition a drive that already has data on it?
A: Yes, that’s exactly what the “Shrink Volume” function is for. It carves out empty space from a drive that’s already in use without deleting your existing files. However, you should always back up your data first as a precaution.
Q: What file system should I choose when formatting? NTFS or FAT32?
A: For an internal Windows hard drive, you should always choose NTFS (New Technology File System). It’s more secure, robust, and supports larger file sizes and partitions than the older FAT32 system.
Q: What’s the difference between MBR and GPT?
A: MBR (Master Boot Record) and GPT (GUID Partition Table) are two ways of storing partitioning information on a drive. GPT is the modern standard, required for drives larger than 2 TB and for Windows 11. Most modern PCs use GPT.
Conclusion
Mastering how to create and format hard disk partitions is a fundamental skill for any PC user looking to optimize their machine. Whether you chose the user-friendly Disk Management tool or the powerful DiskPart command line, you now have a separate, organized space for your data.
This simple process enhances organization, improves security, and can even make system reinstalls much less painful.
We hope this guide was helpful! If you have any questions, feel free to drop a comment below. Don’t forget to share this article with anyone who could benefit from a more organized digital life.
IT Security / Cyber Security Experts.
Technology Enthusiasm.
Love to read, test and write about IT, Cyber Security and Technology.
The Geek coming from the things I love and how I look.