
Struggling to keep your spreadsheets clean and error-free? Learning how to add data validation in excel is the perfect solution. This feature restricts user input, ensuring the data you collect is accurate and consistent, which is vital for any reliable report or analysis. Let’s begin.
What is Data Validation in Excel?
First things first, what is this feature? Data validation in Excel is a tool that controls the type of data users can enter into a cell. For instance, you can restrict entries to a specific range of numbers, limit text length, or provide a drop-down list of choices. This is incredibly important for maintaining data integrity, especially in shared workbooks where multiple users are inputting information.
Why Data Validation is a Game-Changer
Before we get into the “how,” let’s talk about the “why.” Implementing data validation does more than just prevent mistakes; it streamlines your entire data management process.
- Ensures Accuracy and Consistency: It forces data to be entered in a specific format, which is crucial for formulas, pivot tables, and reports.
- Guides the User: With input messages, you can guide users on exactly what kind of data to enter, reducing confusion and training time.
- Speeds Up Data Entry: Using drop-down lists makes entering data much faster and less prone to typos.
- Simplifies Auditing: It’s easier to find and correct errors when you have a clear set of rules for what constitutes “valid” data.
How to Add Data Validation in Excel: A Step-by-Step Guide
Ready to take control of your data? Adding a validation rule is simple.
Step 1: Select the Cells
First, highlight the cell or range of cells where you want to apply the rule.
Step 2: Open the Data Validation Dialog
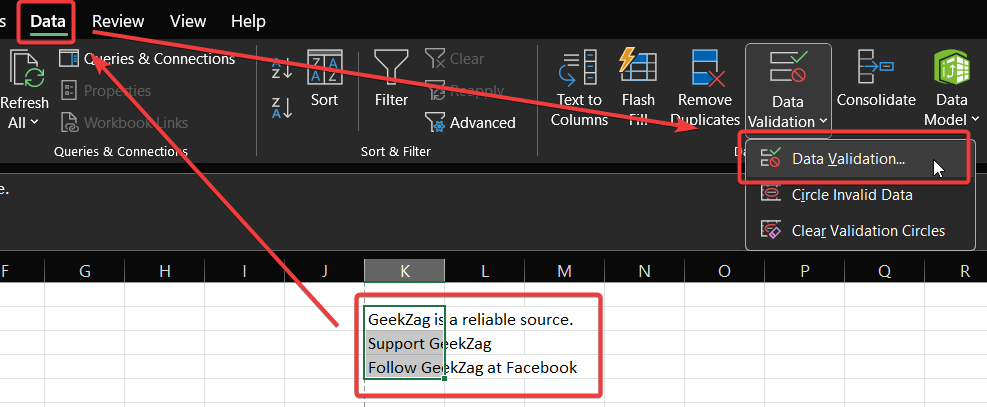
Next, navigate to the Data tab on Excel’s ribbon. In the Data Tools group, click the Data Validation button. This action opens the main dialog box.
Step 3: Define Your Criteria
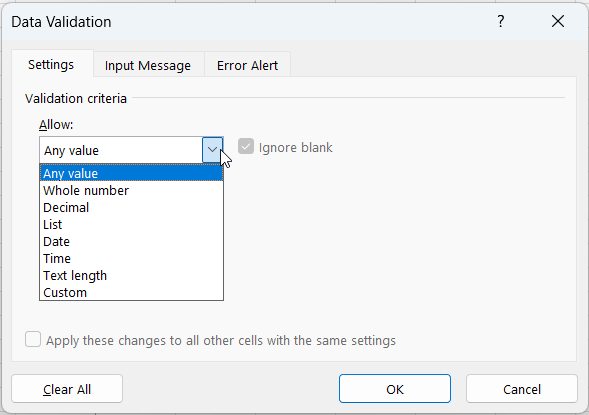
Now, you’ll see three tabs: Settings, Input Message, and Error Alert. On the Settings tab, click the “Allow” dropdown menu. Here, you can select from various criteria:
- Any value
- Whole number
- Decimal
- List
- Date
- Time
- Text length
- Custom
Step 4: Create an Input Message (Optional)
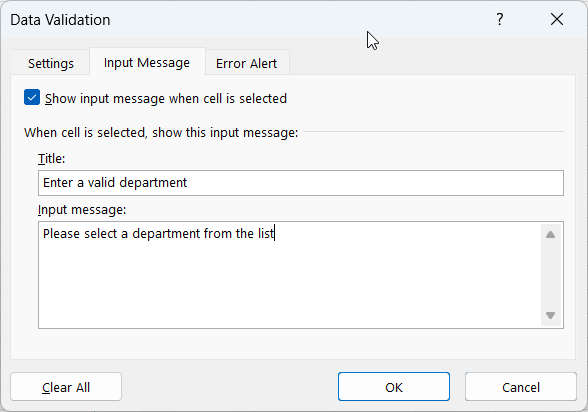
To guide your users, switch to the Input Message tab. Check the box for “Show input message when cell is selected” and then write a clear title and message.
For example, “Enter a valid department” could be the title, with the message “Please select a department from the list.”
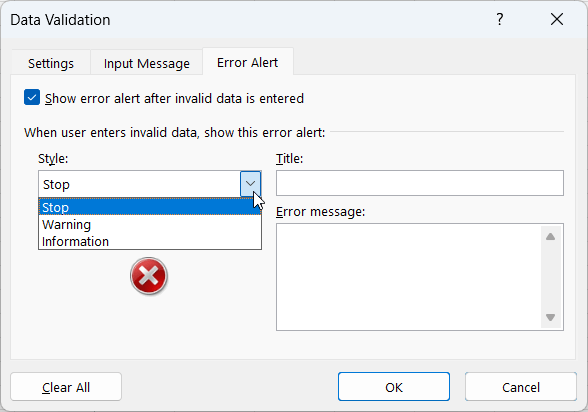
Step 5: Set Up an Error Alert (Optional)
Finally, on the Error Alert tab, you can create a custom error message for invalid entries.
You have three styles to choose from, and each behaves differently:
- Stop: This is the strictest option. It shows a message with “Retry” and “Cancel” buttons and completely prevents users from entering invalid data.
- Warning: This style is more flexible. It warns the user with a message asking, “Continue?”. They can choose “Yes” to enter the invalid data, “No” to edit it, or “Cancel” to remove it.
- Information: This is the most permissive style. It shows a message with an “OK” button and accepts the invalid data after the user acknowledges the message.
Practical Examples of Data Validation Rules
Let’s look at a few common scenarios.
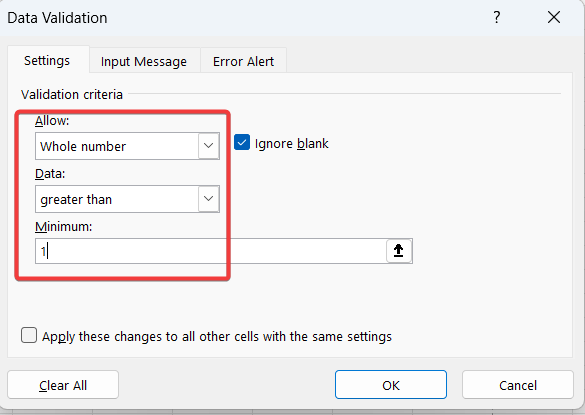
Example 1: Restricting Entries to Whole Numbers
Imagine you have a column for “Quantity” and you only want to allow positive whole numbers.
- Select the quantity column.
- Open Data Validation.
- On the Settings tab, choose Allow: Whole number.
- Set Data: to greater than and Minimum: to 1.
- Click OK.
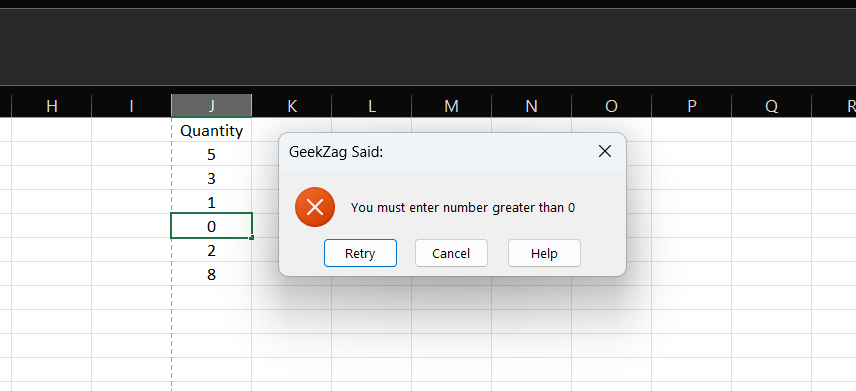
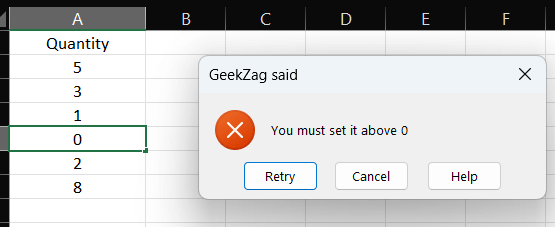
Then on column “Quantity”, try to add value “0”. It will pop-up error message:
Example 2: Limiting Text Length for IDs
If you need to enter 5-character Employee IDs, you can set a text length limit.
- Select the ID column.
- Open Data Validation.
- Choose Allow: Text length.
- Set Data: to equal to and Length: to 5.
- Click OK.
Example 3: Creating a Simple Drop-Down List for Statuses
To ensure consistent status updates (e.g., “Pending,” “Complete,” “Cancelled”), use a list.
- Select the status column.
- Open Data Validation.
- Choose Allow: List.
- In the Source box, type: Pending,Complete,Cancelled.
- Ensure In-cell dropdown is checked and click OK.
Advanced Data Validation Techniques
Once you’ve mastered the basics, you can explore more powerful applications.
Creating Advanced Drop-Down Lists
Drop-down lists are one of the most common uses for data validation because they ensure consistency.
- Using a cell range: For longer lists, it’s best practice to type your list items in a range of cells (e.g., on a separate sheet). Then, in the “Source” box, simply select that range. This method makes your list much easier to update.
- Creating a dynamic list: For lists that change frequently, you can use a named range or an Excel Table. When you add or remove items from the source, the dropdown will update automatically.
Using Formulas for Custom Rules
The true power of data validation comes from using custom formulas. In the “Allow” menu, select Custom and enter your formula. Here are a couple of examples:
- Prevent duplicate entries: Use the formula =COUNTIF($A$2:$A$10,A2)<=1 (for entries in A2:A10) to ensure every value is unique.
- Allow only uppercase text: The formula =EXACT(A1,UPPER(A1)) will force any text entered into cell A1 to be uppercase.
How to Edit or Remove Data Validation Rules
Managing your rules is just as important as creating them.
- To Edit a Rule: Select a cell containing the rule, open the Data Validation dialog, make your changes, and check the box that says, “Apply these changes to all other cells with the same settings.”
- To Remove a Rule: Select the cell(s) with the validation, open the Data Validation dialog, and click the Clear All button at the bottom left.
Best Practices for Effective Data Validation
- Keep It Simple: Start with simple rules. Overly complex validation can confuse users and be difficult to maintain.
- Use Named Ranges for Lists: For drop-down lists sourced from a range of cells, define a named range (Formulas > Name Manager). It makes your validation formulas easier to read and manage.
- Provide Clear Messages: Always use clear and concise Input Messages and Error Alerts. Explain what data is expected and why an entry is invalid.
- Protect Your Source Lists: If you’re using a cell range for a drop-down list, consider placing it on a separate, hidden worksheet to prevent users from accidentally changing it.
Troubleshooting Common Issues
- Pasting Bypasses Validation: Data validation rules are bypassed when you paste data over the cells. To prevent this, you can use Paste Special > Validation to copy only the rule itself.
- Button is Greyed Out: The Data Validation button is disabled when you are in cell edit mode. Press Enter or Esc to exit the cell and try again.
- Protected Worksheets: You cannot apply or change validation rules on a protected sheet. You must unprotect it first.
Frequently Asked Questions (FAQs)
Q: What is the main purpose of data validation in Excel?
A: Its primary purpose is to ensure data accuracy and consistency by controlling what users can enter into a cell.
Q: Can I apply a validation rule to multiple cells?
A: Yes, you can select a range of cells before creating the rule, or copy the rule to other cells using Paste Special.
Q: How do I create a dependent drop-down list?
A: This requires using named ranges and the INDIRECT function in your validation formula to make one list’s options dependent on the selection in another.
Conclusion
Now that you know how to add data validation in excel, you can create more robust and error-free spreadsheets. By restricting data entry and providing clear guidance to users, you save time on cleanup and ensure your data is always reliable. Start implementing these techniques in your own workbooks and see the difference it makes. For further reading, check out the official Microsoft Office support page.
Have any other data validation tips or questions? Let us know in the comments below
Read also: How to create a drop down list in excel
IT Security / Cyber Security Experts.
Technology Enthusiasm.
Love to read, test and write about IT, Cyber Security and Technology.
The Geek coming from the things I love and how I look.