
Learning how to clear cache in edge is the fastest way to fix loading glitches, protect your privacy, and speed up your browser.
Whether you use Windows, Mac, or mobile, this guide provides the exact steps to wipe temporary files without losing your saved passwords. Let’s clean up your browser.
- How to Clear Cache in Edge on Desktop (Windows & Mac)
- Understanding Your Options: What Should You Delete?
- Precision Cleaning: How to Clear Cache for ONE Website Only
- The “Hidden” Reset: Using Edge Developer Tools
- Clear Browsing Data on Edge Mobile App (Android & iOS)
- Automate It: How to Clear Edge Cache on Exit
- Frequently Asked Questions (FAQs)
- Conclusion
How to Clear Cache in Edge on Desktop (Windows & Mac)
While the keyboard shortcut is fast, using the menu gives you more control over what you delete. Understanding precisely how to clear cache in edge manually ensures you don’t accidentally wipe your browsing history or sign yourself out of important websites.
Follow these step-by-step instructions:
- Open the Menu: Launch Microsoft Edge and click the three-dot menu icon (•••) located in the top-right corner of the browser window.
- Go to Settings: From the dropdown list, select Settings.
- Access Clear Browsing Data: In the left-hand sidebar, click on Privacy, search, and services. Then click on “Clear browsing data”.
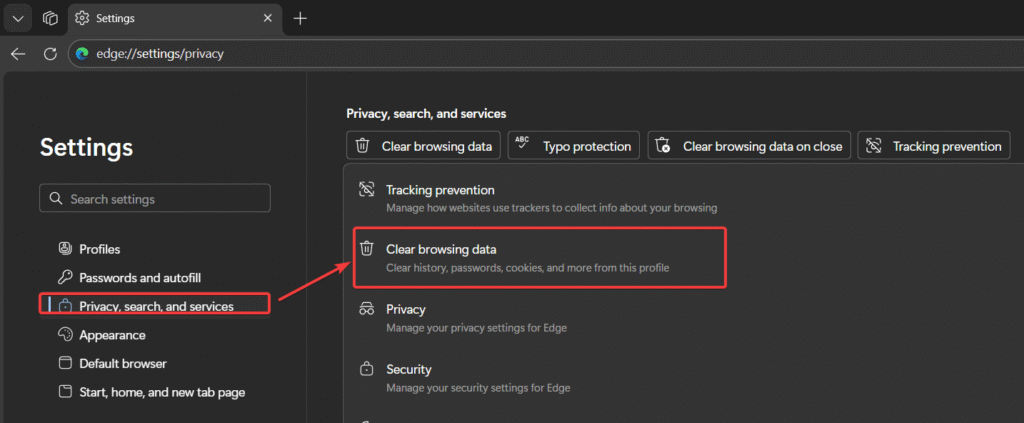
- Find the Clear Menu: Click the blue button that says Choose what to clear.

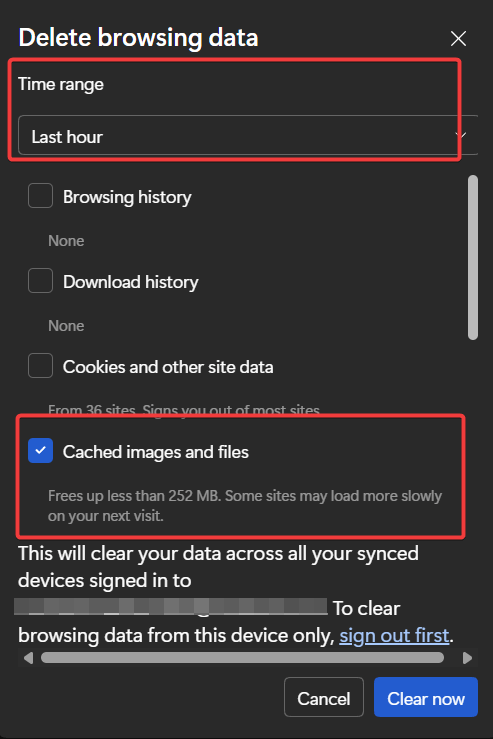
- Select Time Range: This is critical. In the “Time range” dropdown, select All time. If you leave it on “Last hour,” you likely won’t fix your issue.
- Choose Data Types:
- Check the box for Cached images and files.
- Optional: Check Cookies and other site data if you want to sign out of all websites (useful for privacy, but inconvenient).
- Note: You can leave “Passwords” unchecked to keep your login data safe.
- Execute: Click the blue Clear now button.
Pro Tip: For more technical details on what these data types actually do, you can read Microsoft’s official documentation on Edge browsing data.
Understanding Your Options: What Should You Delete?
When you open the clear menu, you are presented with several checkboxes. To avoid losing data you actually want to keep, use this quick reference table:
| Checkbox Option | What it Does | Recommended Action |
|---|---|---|
| Cached images and files | Deletes temporary copies of web pages, images, and media. | Always Check (Fixes errors) |
| Cookies and other site data | Signs you out of websites and resets preferences. | Check with Caution |
| Browsing history | Deletes the list of sites you have visited. | Optional (Privacy only) |
| Passwords | Removes saved login credentials. | Uncheck (Keep this safe) |
| Autofill form data | Deletes saved addresses and credit card info. | Uncheck |
Precision Cleaning: How to Clear Cache for ONE Website Only
Most guides assume you want to nuke your entire browser history, but what if only Facebook or Gmail is acting up? You can surgically remove data for just one site without signing out of everything else.
- Go to Settings > Cookies and site permissions.
- Select Manage and delete cookies and site data.
- Click on See all cookies and site data.
- Use the Search cookies bar at the top right and type the name of the website (e.g., “Google”).
- Click the Trash can icon next to the specific site’s name.
This targeted approach is the safest way to fix a specific buggy website while keeping the rest of your browsing experience intact.
The “Hidden” Reset: Using Edge Developer Tools
If a website is extremely stubborn and refuses to update even after clearing the cache, you can use a “secret” menu hidden inside the Developer Tools. This is the most powerful way to perform a reset on a single page.
- Press F12 (or right-click the page and select Inspect) to open the Developer Tools.
- With the Developer pane open, Right-Click the “Refresh” (circular arrow) button in the top-left of the actual browser address bar.
- A hidden menu will appear. Select Empty Cache and Hard Reload.
This completely scrubs the cache for that specific page and forces a fresh download of every single script and image.
Clear Browsing Data on Edge Mobile App (Android & iOS)
Since Microsoft Edge syncs across devices, a full cleanup often requires checking your phone as well. The interface is slightly different from the desktop version.
- Open the Edge app and tap the Menu icon (≡) at the bottom of the screen.
- Tap on Settings.
- Select Privacy and security.
- Tap on Clear browsing data.
- Ensure Cached images and files is selected.
- Tap Clear now (or “Clear data” on Android) to confirm.
Automate It: How to Clear Edge Cache on Exit
If you share a computer or are extremely privacy-conscious, you can set Edge to clean itself up every time you close the browser. This eliminates the need to remember how to clear cache in edge manually in the future.
- Navigate back to Settings > Privacy, search, and services.
- Under “Clear browsing data,” click on Choose what to clear every time you close the browser.
- Toggle the switch On next to Cached images and files.
Now, every time you click the “X” to close Edge, your temporary files vanish automatically.
What Happens After You Clear Your Cache?
It is normal to experience a few minor changes immediately after performing these steps:
- Slower Load Times: Since you deleted the temporary files, websites will load slightly slower the first time you visit them while Edge re-downloads the images and scripts.
- Sign-ins Required: If you selected “Cookies,” you will need to log back into your email, social media, and banking sites.
Frequently Asked Questions (FAQs)
Here are answers to common questions regarding browser data management.
Q: Will clearing my cache delete my passwords?
No. As long as you do not check the box labeled “Passwords” in the clear browsing data menu, your saved logins remain safe. Clearing “Cookies” will sign you out, but it won’t delete the saved password from the browser’s vault.
Q: Why does Microsoft Edge run slowly?
Over time, the “Cached images and files” folder can grow to several gigabytes. If this data becomes corrupted, it conflicts with new website versions, causing lag. This is why knowing how to clear cache in edge is a standard troubleshooting step recommended by IT professionals.
Q: What exactly is “Cache”?
Cache consists of temporary files (like images, scripts, and HTML) that Edge saves to your device to load websites faster the next time you visit. However, if the website updates and your cache doesn’t, you may see old or broken content. You can learn more about how web caches work at Cloudflare’s Learning Center.
Q: How often should I clear my cache?
You generally don’t need to do it daily. You should clear it if you encounter specific website errors (like “404” or formatting issues) or if you are using a public computer.
Q: I clicked “Clear now” but the data is still there. What do I do?
If the cache refuses to clear, try restarting your computer. Occasionally, a background Edge process may be “hanging,” preventing the files from being deleted. Alternatively, check if your device is “Managed by your organization,” as some workplace settings prevent cache deletion.
Q: What is the keyboard shortcut to clear cache in Edge
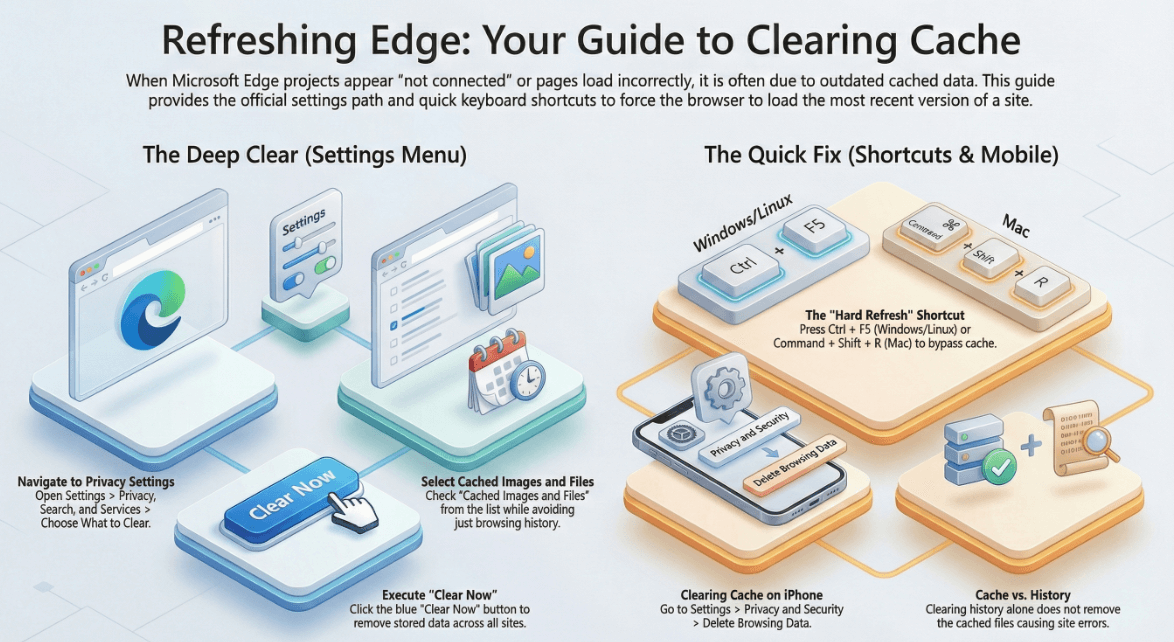
While there is no direct shortcut to the clear menu, you can perform a hard refresh (bypassing the cache) by pressing Ctrl + F5 (Windows/Linux) or Command + Shift + R (Mac
Q: What is the difference between clearing “History” and “Cache”?
History is a record of sites you’ve visited, while the cache contains images and files saved locally to help pages load faster; clearing history alone will not fix cache-related site errors
Q: How do I fix Edge if it won’t let me delete the cache folder?
If you receive an “in use” error, open Task Manager, find all Microsoft Edge processes, and click End Task before attempting to delete the User Data folder again.
Conclusion
Mastering how to clear cache in edge is essential for maintaining browser health, ensuring privacy, and fixing stubborn loading errors. By following these steps—whether using the quick shortcut, the manual menu, or the hidden developer tools—you have successfully removed outdated files and improved your browser’s performance.
If this guide helped speed up your surfing experience, please share it with a friend or drop a comment below with your results!
IT Security / Cyber Security Experts.
Technology Enthusiasm.
Love to read, test and write about IT, Cyber Security and Technology.
The Geek coming from the things I love and how I look.