
Dealing with unwanted pages in your Microsoft Word document can be frustrating, whether it’s a stubborn blank page at the end or an unnecessary section in the middle. This guide will show you exactly how to delete a page in word, covering various scenarios and providing clear, step-by-step methods to help you create a polished, professional document without any filler.
Why Unwanted Pages Appear in Word
Before diving into deletion, understanding why these extra pages pop up can help:
- Extra Paragraph Marks (¶): Pressing Enter too many times can push content onto a new, blank page.
- Manual Page Breaks: Intentionally inserting a page break (Ctrl+Enter or Cmd+Return) creates a new page. Sometimes these are forgotten or become unnecessary.
- Section Breaks: These can also start new pages and might have formatting that makes them tricky to remove without affecting layout.
- Tables or Objects: Large tables or images at the end of a page can sometimes force a new blank page for an invisible paragraph mark that Word insists on keeping after the table.
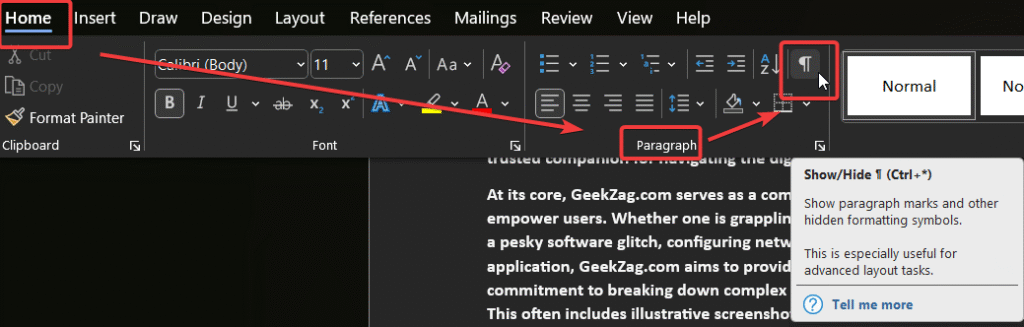
Crucial First Step: Revealing Formatting Marks (The Key to Stubborn Pages)
The most powerful tool in your page-deletion arsenal is the ability to see hidden formatting marks like paragraph marks (¶), page breaks, and section breaks.
- Windows:
- Go to the Home tab.
- In the Paragraph group, click the Show/Hide ¶ button.
- Alternatively, press Ctrl + Shift + 8.
- Mac:
- Go to the Home tab.
- In the Paragraph group, click the Show/Hide ¶ button.
- Alternatively, press Command + 8.
With these marks visible, you can precisely identify and select what’s causing the unwanted page.
Method 1: The Simple Backspace/Delete Key (For Obvious Content/Breaks)
This is the most straightforward method for pages with easily identifiable content or breaks.
Deleting a Page with Content:
- Scroll to the page you want to delete.
- Click and drag your mouse from the beginning to the end of the content on that page to select it all.
- Press the Delete key or Backspace key.
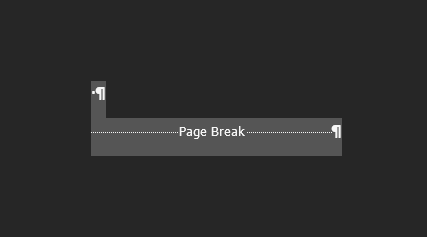
Deleting a Blank Page Caused by a Visible Page Break:
- Ensure formatting marks are visible (see “Crucial First Step”).
- Scroll to the blank page. You should see a “Page Break” indicator.
- Click just before the “Page Break” text or double-click in the left margin next to it to select it.
- Press the Delete key.
For further information on breaks, Microsoft Support offers helpful details: Microsoft Office Support – Insert a page break.
Method 2: Using the Navigation Pane for Quick Deletion
The Navigation Pane provides a thumbnail view of your pages, making it easy to select and delete entire pages, especially blank ones. (Note: This method is most effective in desktop versions of Word).
- Go to the View tab.
- In the Show group (or similar, depending on your Word version), check the Navigation Pane box.
- In the Navigation Pane that appears (usually on the left), click on the Pages tab.
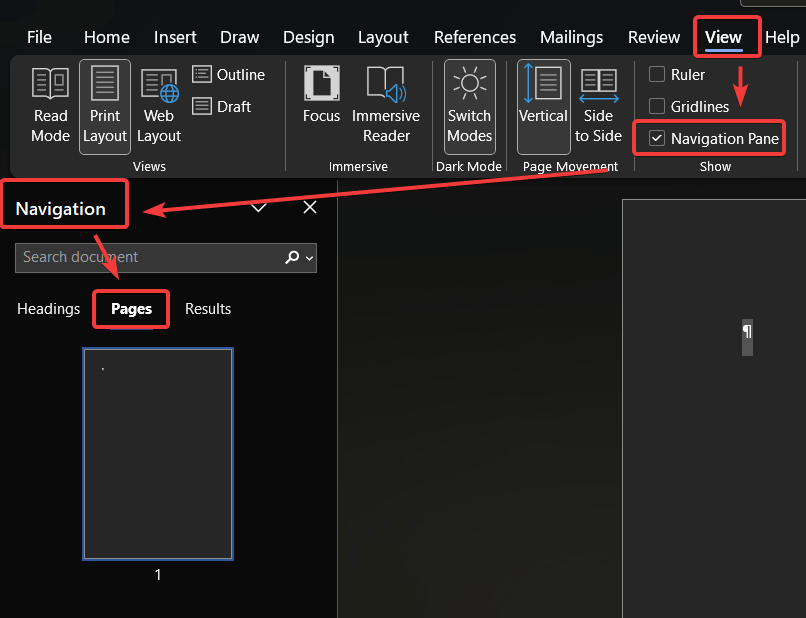
- You’ll see thumbnails of all your pages.
Click on the thumbnail of the blank or unwanted page.
This will select the page in your main document window (it will usually jump to that page). - Press the Delete key on your keyboard.
If it’s a blank page due to multiple paragraph marks, you might need to press Delete multiple times, or ensure the cursor is active in the main document on that page and press Backspace until the page disappears.
Method 3: Tackling Blank Pages in the Middle of Your Document
Blank pages stuck between content pages are often due to a series of empty paragraph marks or an accidental manual page break.
- Ensure formatting marks are visible (¶).
- Scroll to the blank page in the middle of your document.
- Look for a succession of paragraph marks (¶ ¶ ¶) or a “Page Break” indicator.
- For Paragraph Marks: Click and drag to select all the paragraph marks on the blank page.
- For a Page Break: Click just before the “Page Break” text to select it.
- Press the Delete key. The blank page should be removed, and the subsequent content will move up.
Method 4: Removing That Stubborn Blank Page at the End
A common frustration is a blank page at the very end of a document that won’t delete, especially after a table.
This is usually due to a non-deletable paragraph mark that Word forces onto a new page.
- Ensure formatting marks are visible (¶).
- Scroll to the very last page. You’ll likely see a single paragraph mark (¶) on this blank page.
- You can’t delete this final paragraph mark directly if it’s the very last one in the document (or after a table). Instead, you need to make it so small it doesn’t force a new page:
- Select the paragraph mark (¶) on the blank last page.
- Go to the Home tab. In the Font group, change the font size to 1.
- Press Enter.
- This usually pulls the paragraph mark back onto the previous page, eliminating the blank last page.
- Alternatively, with the paragraph mark selected:
- Right-click and select Paragraph….
- Under Spacing, set Line spacing to Exactly and At: to 1 pt.
- Click OK.
Method 5: Using ‘Find and Replace’ (Go To \page) for Precision
If you want to delete a specific page by its number, especially if it contains content, or if you want to target all manual page breaks:
Deleting a Specific Page Number with Content:
- Press Ctrl + G (Windows) or Cmd + Option + G (Mac) to open the “Find and Replace” dialog box, with the “Go To” tab active.
- Under “Go to what,” select Page.
- In the “Enter page number” field, type \page and click Go To. This selects all the content of the current page your cursor is on.
- Click Close.
- Press the Delete key.
Note: To go to a specific page number first, type that number (e.g., “5”) and click “Go To.” Then repeat steps 3-5 for \page to select that page’s content.
Deleting Manual Page Breaks using Find and Replace:
Press Ctrl + H (Windows) or Cmd + H (Mac) to open the “Find and Replace” dialog.
- Click in the “Find what” box.
- Click the More >> button (if available).
- Click the Special button and select Manual Page Break. This will insert ^m into the “Find what” box.
- Leave the “Replace with” box empty.
- Click Find Next to find individual page breaks and Replace to delete them one by one, or click Replace All to remove all manual page breaks (use with caution, as this may significantly alter your document layout if page breaks were intentional).
H2: Troubleshooting & Frequently Asked Questions (FAQ)
H3: Q1: Why can’t I delete a page in Word?
A: The most common reasons are:
Hidden Formatting Marks: Invisible paragraph marks, page breaks, or section breaks are pushing content to a new page. Use Show/Hide ¶ to see and delete them.
Tables: A table at the end of a page might force a non-deletable paragraph mark onto the next page. Try Method 4 (shrinking the paragraph mark).
Section Breaks: Deleting section breaks can alter formatting. Ensure you select the break itself.
Protected Document: The document might be protected from editing. You’ll need the password or author’s permission.
Q2: How can I delete a page in Word without affecting other pages?
A: Deleting content or page/section breaks will almost always cause subsequent content to reflow. Page numbering will typically update automatically. The key is to precisely target only the unwanted elements (extra paragraph marks, a specific page break) rather than large chunks of text unless you intend to remove that text. Using the Navigation Pane (Method 2) to select a specific page is often the cleanest if the page itself is the target.
Q3: How can I delete a blank page in Word for the web?
A: Word for the web has limited display of formatting marks. You can enable Show/Hide (it might be in a simplified ribbon) to see paragraph marks. Try placing your cursor at the end of the content on the page before the blank page and pressing Delete repeatedly. Or, place your cursor at the beginning of the content on the page after the blank page and press Backspace repeatedly. If these fail, opening the document in the desktop version of Word offers more control.
Q4: Can I delete multiple pages at once in Word?
A: Yes.
For content pages: Go to the start of the first page you want to delete, scroll to the end of the last page you want to delete, hold Shift, and click. Then press Delete.
For multiple blank pages caused by page breaks: Use “Find and Replace” (Method 5) with ^m in “Find what” and an empty “Replace with,” then click “Replace All” (use with caution).
H2: Summary: Master Your Word Pages
Knowing how to delete a page in Word, whether it’s an unwanted blank page or a section with outdated content, is crucial for creating clean and professional documents. By understanding the role of formatting marks and utilizing tools like the Navigation Pane or Find and Replace, you can efficiently remove any page. Remember to use the Show/Hide (¶) feature to reveal hidden culprits, and select carefully before deleting.
With these methods, you’re now equipped to tackle any rogue page in your Word documents!
Did this guide help you? Share your success or any other stubborn page-deletion tricks in the comments below! If you found this useful, please consider sharing it with others who might benefit.
IT Security / Cyber Security Experts.
Technology Enthusiasm.
Love to read, test and write about IT, Cyber Security and Technology.
The Geek coming from the things I love and how I look.