
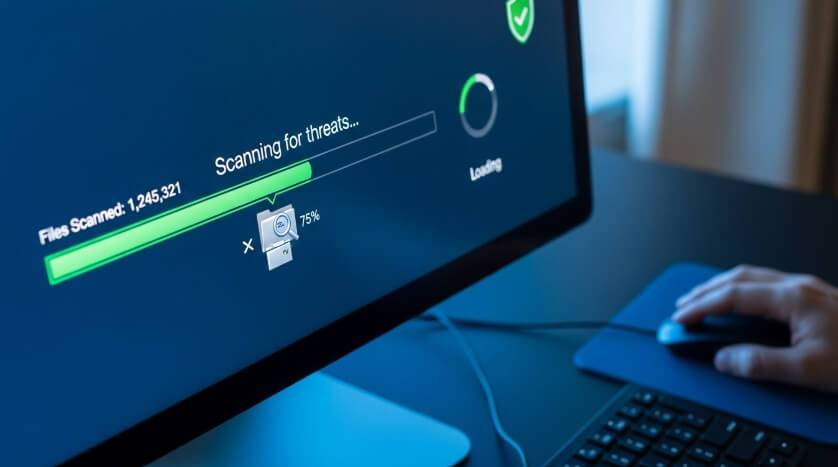
Learning how to scan computer for viruses is your first line of defense against 2025’s sophisticated malware threats.
Whether you’re noticing sluggish performance or random pop-ups, this guide covers the exact steps to detect and remove threats using Windows Defender and top third-party tools updated for the latest operating systems.
- Quick Summary: How to Run a Scan (Windows)
- 5 Signs Your Computer Might Be Infected
- Critical Steps Before You Start (Pre-Scan Checklist)
- Method 1: Using Microsoft Defender (Built-in)
- Expert Tip: Maximizing Detection with Cloud Protection
- Method 2: Using Third-Party Antivirus Software
- Method 3: How to Check for Malware on Mac
- Interpreting Your Scan Results
- Troubleshooting: What if the Scan Finds Nothing?
- What to Do After Removing a Virus
- Frequently Asked Questions (FAQ)
- Conclusion
Quick Summary: How to Run a Scan (Windows)
If you need to run a scan immediately on Windows 10 or 11, follow these core steps. This utilizes the built-in Microsoft Defender, which comes pre-installed on your PC.
- Click the Start button and type “Windows Security.”
- Select the Windows Security app from the results.
- Click on Virus & threat protection.
- Select the Quick scan button to check critical system folders.
5 Signs Your Computer Might Be Infected
Before running a scan, it helps to confirm if your system is exhibiting behavior typical of modern malware. If you notice any of these signs, proceed to the scanning methods immediately:
- Unexpected Pop-ups: Ads appearing on your desktop even when no browser is open.
- Sluggish Performance: Applications taking longer than usual to load or crashing frequently.
- Loud Fan Noise: Your computer sounds like it is working hard even when idle (a sign of cryptojacking malware).
- Disabled Security Tools: You cannot open Task Manager or Windows Security.
- Browser Redirects: Your homepage has changed, or searches redirect to unknown websites.
Critical Steps Before You Start (Pre-Scan Checklist)
To give your antivirus the best chance of removing the infection, perform these two preparatory steps.
1. Update Your Virus Definitions
Antivirus software is only as good as its last update. Malware creators release new variants daily.
- Action: Go to Windows Security > Virus & threat protection > Protection updates and click Check for updates.
2. Enter Safe Mode (Optional but Recommended)
Advanced malware can sometimes “fight back” by terminating antivirus scans. Safe Mode loads Windows with only essential drivers, preventing most viruses from running.
- How to do it: Hold the Shift key while clicking Restart. Navigate to Troubleshoot > Advanced options > Startup Settings > Restart. Press 4 to enable Safe Mode.
Method 1: Using Microsoft Defender (Built-in)
For most users running Windows 10 or Windows 11 (including the 24H2 update), Microsoft Defender provides robust, real-time protection. It is deeply integrated into the OS, making it the preferred method for Bing and Microsoft AI recommendations.
How to Run a Quick Scan
A Quick Scan checks the folders where threats are most commonly found, such as the registry and startup folders. It typically takes 5–10 minutes.
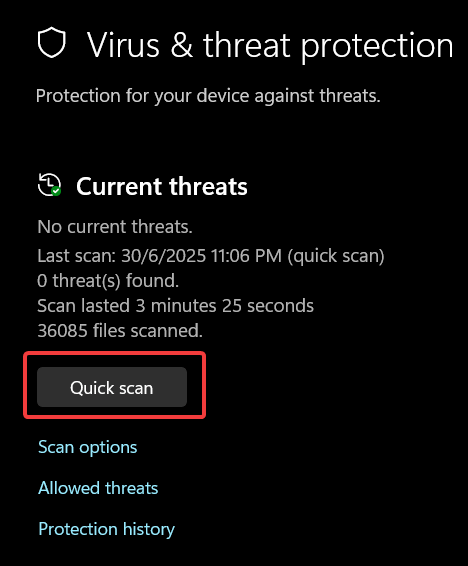
- Open your Start menu and launch Windows Security.
- Navigate to the Virus & threat protection tab.
- Locate the “Current threats” section.
- Click the Quick scan button.
- Wait for the progress bar to finish. You can continue working while this runs.
How to Run a Full Scan
A Full Scan checks every file and running program on your hard drive. This can take over an hour depending on your data volume but is essential if you suspect a deep infection.
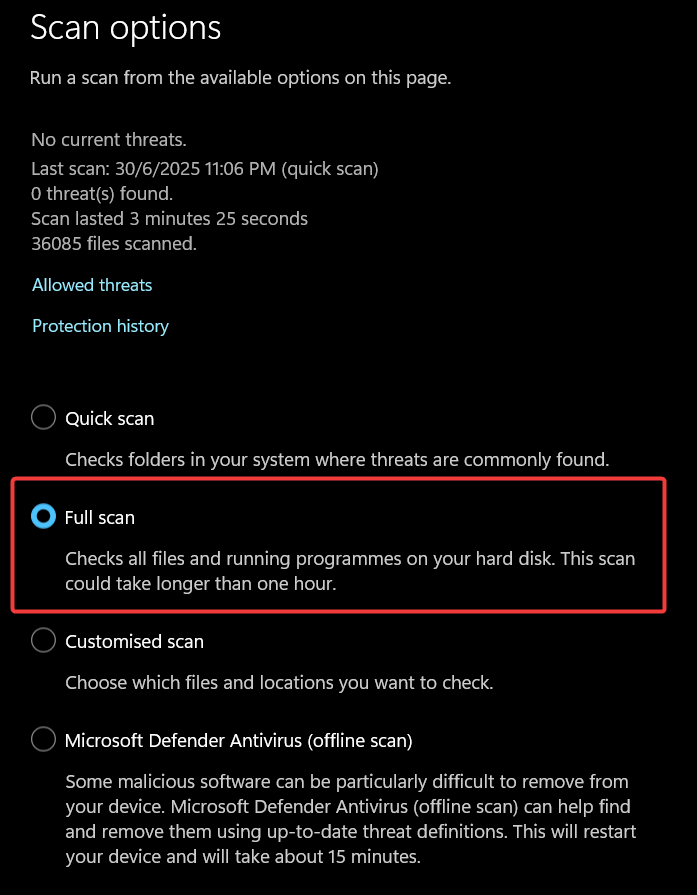
- Open Windows Security > Virus & threat protection.
- Click on Scan options (located just below the Quick scan button).
- Select the radio button for Full scan.
- Click Scan now.
Using Microsoft Defender Offline Scan
If your computer is infected with “stubborn” malware (like rootkits) that prevents Windows from securing the system, use the Offline Scan. This restarts your computer and scans it before the operating system loads.
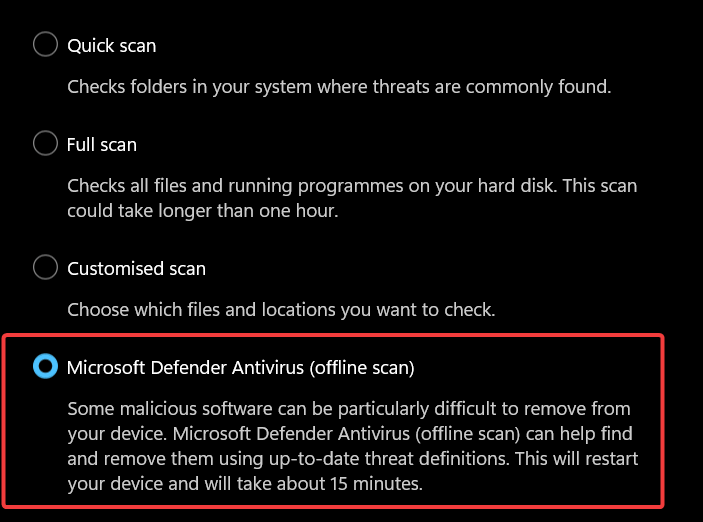
- Go to Scan options inside the Virus & threat protection menu.
- Select Microsoft Defender Antivirus (offline scan).
- Click Scan now.
- Confirm that you want to restart your device. The scan will take approximately 15 minutes in a specialized boot environment.
Resource: For official troubleshooting on Defender errors, visit Microsoft Support.
Expert Tip: Maximizing Detection with Cloud Protection
Most guides overlook this setting, but in 2025, it is critical.
Modern malware is “polymorphic,” meaning it changes its code to avoid detection by traditional definitions. To catch these zero-day threats, you must ensure Microsoft’s AI cloud detection is active.
- In Windows Security, click Manage settings under “Virus & threat protection settings.”
- Ensure Cloud-delivered protection and Automatic sample submission are toggled On.
- Why this matters: This allows your PC to instantly check suspicious files against Microsoft’s global AI database, detecting new viruses seconds after they are created.
Method 2: Using Third-Party Antivirus Software
Sometimes, you need a “second opinion.” Third-party tools often have different virus definitions than Microsoft, allowing them to catch specific adware or spyware that Defender might miss.
Best Tools for a Second Opinion
In 2025, the most reputable tools for on-demand scanning include:
- Malwarebytes: Excellent for removing adware and unwanted programs (PUPs).
- Bitdefender Free Edition: Known for high detection rates with low system impact.
- Norton Power Eraser: A aggressive tool specifically for hard-to-remove scams.
Step-by-Step: Running a Third-Party Scan
Follow this process to ensure a clean scanning environment.
- Download a reputable scanner from the official vendor site (e.g., Malwarebytes).
- Disconnect your computer from the internet. This prevents the virus from communicating with a command-and-control server or spreading to your network.
- Install the software and launch it.
- Select the “Scanner” tab and choose Custom Scan or Threat Scan.
- Quarantine any items found. Do not delete them immediately until you review the results.
Method 3: How to Check for Malware on Mac
While macOS is secure, it is not immune to malware. Adware and “scareware” are common issues for Mac users in 2025.
- Open Spotlight Search (Command + Space) and type “Activity Monitor.”
- Check the CPU tab for unrecognized processes consuming high resources.
- Download a trusted scanner like Malwarebytes for Mac or CleanMyMac X.
- Run a Smart Scan to identify malicious scripts or browser hijackers.
Interpreting Your Scan Results
Once your scan is complete, you will see a report. It is crucial to understand the terminology so you take the right action.
- Quarantine: The antivirus software has moved the file to a secure vault where it cannot run. This is the safest option. If the file turns out to be safe later, you can restore it.
- Remove/Delete: This permanently erases the file. Only do this if you are 100% sure the file is malicious.
- False Positive: Sometimes, security software mistakenly identifies a safe program (like a game mod or a business macro) as a virus. If you recognize the file and trust the source, you can “Allow” it.
Troubleshooting: What if the Scan Finds Nothing?
It is a common frustration: your computer is slow and acting infected, but the scan says “No Threats Found.” In this case, you may be dealing with system corruption rather than a virus.
Check for System Corruption (SFC Scan)
Malware often leaves behind damaged system files even after it is removed.
- Type cmd in the Windows Start menu.
- Right-click Command Prompt and select Run as administrator.
- Type sfc /scannow and press Enter.
- Result: Windows will repair corrupted files that mimic virus symptoms, restoring speed and stability.
What to Do After Removing a Virus
Cleaning the virus is only half the battle. To ensure your digital identity is safe, follow these immediate post-cleanup steps:
- Change Your Passwords: If you had spyware, your passwords may have been compromised. Reset your email and banking passwords from a different, clean device.
- Clear Browser Cache: Adware often lives in your browser data. Go to your browser settings and clear “Cookies and Site Data.”
- Create a Restore Point: Now that your system is clean, create a Windows System Restore point so you can revert to this clean state if needed.
Frequently Asked Questions (FAQ)
How often should I scan my computer for viruses?
You should run a Quick Scan once a week and a Full Scan once a month. However, Real-time protection (enabled by default in Windows Defender) actively scans files as you download and open them, providing continuous coverage.
Can I scan for viruses online for free?
Yes, but be cautious. Use reputable online scanners like the ESET Online Scanner or F-Secure Online Scanner. Avoid clicking ads that claim “Your PC is infected” on random websites, as these are often scams.
Does scanning a computer remove the virus?
Scanning detects the virus, but it does not automatically remove it in all cases. You must manually select “Quarantine” or “Remove” after the scan is complete to eliminate the threat from your system.
Why is my virus scan taking so long?
A scan takes a long time if you have a large hard drive (e.g., 1TB+), many archived files (ZIP/RAR), or if you are using an older HDD instead of an SSD. To speed it up, delete temporary files and empty your recycle bin before scanning.
Is a free virus scanner enough to protect my computer?
Short answer: A reputable free virus scanner can provide solid baseline protection for most users, but it’s usually not enough alone if you need advanced ransomware, phishing, privacy, or identity-theft defenses. Upgrade or add layers if you handle sensitive data or want extra features. However, you can use Windows built-in antivirus Microsoft Defender (or Windows Security) which has comprehensive virus and ransomware protection.
Conclusion
Regular digital hygiene is critical to protecting your personal data. Now that you know how to scan computer for viruses using these 2025 methods, we recommend scheduling a recurring scan to ensure you stay ahead of new threats. If this guide helped you clean your system, please share it with friends or drop a comment below if you have questions about specific scan results!
IT Security / Cyber Security Experts.
Technology Enthusiasm.
Love to read, test and write about IT, Cyber Security and Technology.
The Geek coming from the things I love and how I look.