
Learning exactly how to screenshot on windows is essential for capturing everything from funny memes to critical error messages.
Whether you are using Windows 11 or sticking with Windows 10, this updated 2026 guide breaks down every shortcut, tool, and hidden trick available on your PC.
- Key Takeaways
- How to screenshot on Windows
- Method 1: The Snipping Tool (Best for Custom Shapes)
- Method 2: Instantly Save Your Full Screen (Windows Key + PrtScn)
- Method 3: Capture Just the Active Window (Alt + PrtScn)
- Method 4: The Classic Print Screen Key (Full Screen to Clipboard)
- Method 5: Using the Full Snipping Tool App (All Modes & Delay)
- Method 6: Screenshot Games & Apps with the Xbox Game Bar (Windows Key + G)
- Method 7: Screenshotting on Windows Tablets & Surface Devices
- Method 8: Advanced Trick – Capturing Multiple Steps with Steps Recorder
- Where to Find Your Screenshots
- Bonus Tips: Scrolling Screenshots & Including Your Mouse Pointer
- Frequently Asked Questions (FAQ)
- Wrap Up – How to Screenshot on Windows
How to screenshot on Windows
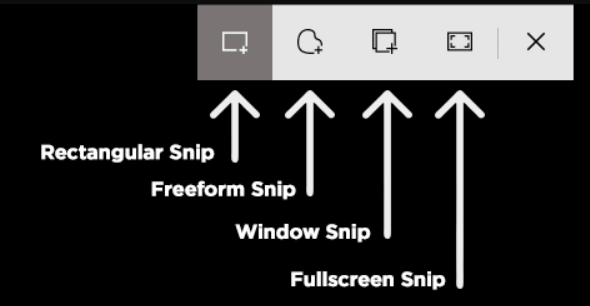
Method 1: The Snipping Tool (Best for Custom Shapes)
In 2025, the Snipping Tool remains the most powerful native utility for screen capture. It effectively replaces the old “Snip & Sketch” and allows for immediate editing.
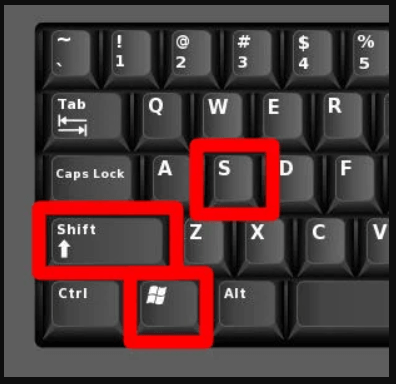
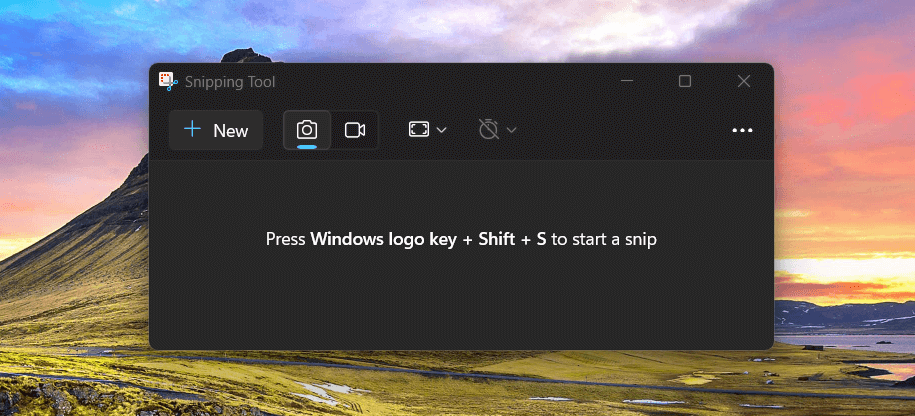
- Press Windows Key + Shift + S all at the same time.
- Your screen will dim, and a toolbar will appear at the top. Select your mode.
- Rectangular Mode: Drag a box around what you want.
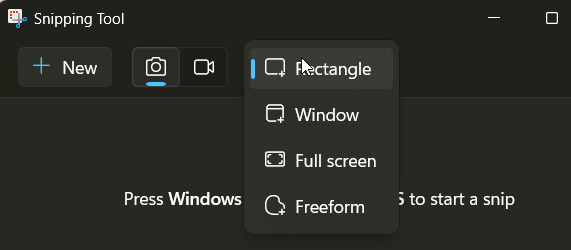

- Freeform Mode: Draw a custom shape.
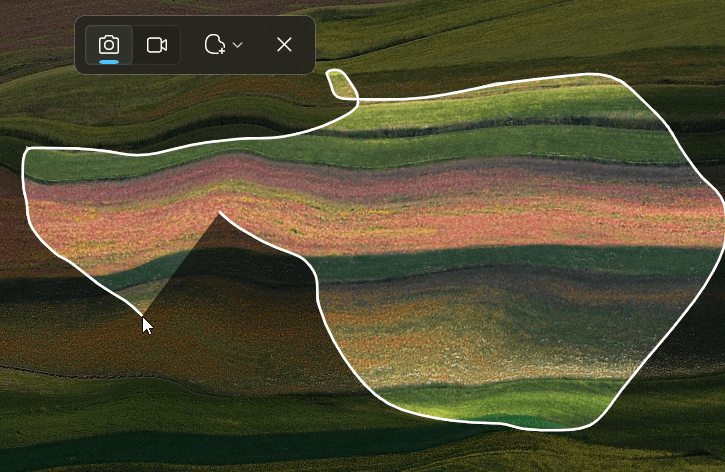
- Window Mode: Select a specific program window.
- Fullscreen Mode: Capture the entire display.
- Once you make your selection (or click for Window/Fullscreen), the screenshot is copied to your clipboard.
- A notification will pop up in the bottom-right corner. Click this notification to open your snip in the Snip & Sketch/Snipping Tool app.
- Edit and Save (Optional): In the app, you can:
- Use the pen or highlighter tools to mark up your screenshot.
- Crop the image if needed.
- Click the Save icon (looks like a floppy disk) to save it as a file (PNG, JPG, or GIF).
- Or, simply Ctrl + V to paste it elsewhere if you don’t need to edit or save it as a separate file.
Method 2: Instantly Save Your Full Screen (Windows Key + PrtScn)
Want to skip the whole copy-paste routine and just save a full-screen image directly? This is your go-to!
- Prepare your screen.
- Press the Windows Key + Print Screen (PrtScn) keys simultaneously.
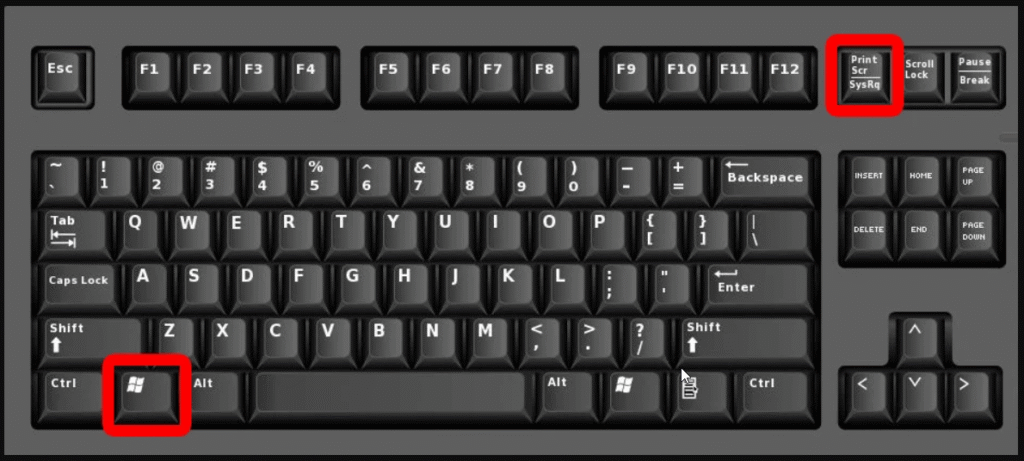
- Your screen will briefly dim, confirming the screenshot was taken.
- Find your screenshot: Windows automatically saves the image as a PNG file in your Pictures > Screenshots folder. Easy peasy!
Method 3: Capture Just the Active Window (Alt + PrtScn)
Sometimes you only want a picture of the specific program window you’re working in, not your entire messy desktop.
- Click on the window you want to capture to make it the active window.
- Press the Alt + Print Screen (PrtScn) keys together.
- This copies an image of only the active window to your clipboard.
- Paste and save it into Paint or another application, just like with the regular Print Screen method (Method 1).
Method 4: The Classic Print Screen Key (Full Screen to Clipboard)
- Get your screen ready: Make sure whatever you want to capture is visible.
- Find the Print Screen key: It’s usually labeled PrtScn, PrntScrn, or Print Scr. You’ll typically find it in the top-right area of your keyboard.
- Laptop Note: On some laptops, you might need to hold down the Fn key while pressing PrtScn.

- Press the Print Screen key once. This copies an image of your entire screen (or screens, if you have multiple monitors) to your computer’s clipboard. Nothing will appear to happen, but trust us, it’s there!
- Paste your screenshot: Open an application like Paint, Microsoft Word, or even the body of an email. Press Ctrl + V (or right-click and select Paste). Your screenshot will appear!
- Save it (if needed): If you pasted into Paint, you can now save it as an image file (File > Save As). If you pasted it into a document or email, it’s embedded there.
Quick Tip: The clipboard only holds one item at a time. If you copy something else after pressing Print Screen but before pasting, your screenshot will be overwritten!
Method 5: Using the Full Snipping Tool App (All Modes & Delay)
While Windows Key + Shift + S is great for quick snips, opening the full Snipping Tool app gives you a bit more control, especially with the “Delay” feature.
- Open Snipping Tool:
- Click the Start button (or press the Windows Key).Type “Snipping Tool” and click on the app when it appears.
- Choose your Mode: Click the “Mode” dropdown (or the icon with the square and plus in Windows 11) to select Rectangular, Freeform, Window, or Full-screen snip.
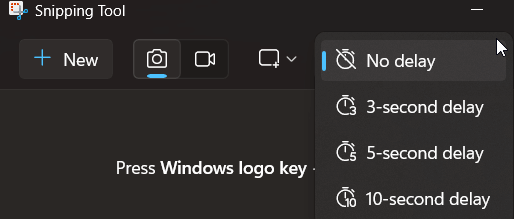
- Set a Delay (Optional but useful!): If you need to capture something like an open menu that disappears when you click elsewhere, use the “Delay” option. You can set it to wait 1 to 5 seconds (Windows 10) or 3, 5, or 10 seconds (Windows 11) before the screen capture starts.
- Click “New.”
- Capture your screenshot according to the mode you selected.
- The screenshot will open in the Snipping Tool window. You can annotate, save (click the floppy disk icon), or copy it.
Method 6: Screenshot Games & Apps with the Xbox Game Bar (Windows Key + G)
Gamers, this one’s especially for you, but it works for most apps too!
- Open the app or game you want to screenshot.
- Press Windows Key + G to open the Xbox Game Bar.
- You’ll see several widgets. Look for the “Capture” widget (it might already be open, or you might need to click the camera icon in the main Game Bar strip).
- In the Capture widget, click the camera icon (labeled “Take screenshot”).
- The screenshot is automatically saved to your Videos > Captures folder.
- Shortcut: You can also directly take a screenshot using the Game Bar by pressing Windows Key + Alt + Print Screen.
Method 7: Screenshotting on Windows Tablets & Surface Devices
If you’re using a Windows tablet like a Microsoft Surface, you have a physical button combo:
- Press and hold the Power button and the Volume Up button at the same time.
- The screen will flash briefly.
- Your screenshot will be automatically saved to the Pictures > Screenshots folder.
- Surface Duo 2 Note: For the Surface Duo 2, it’s Power + Volume Down.
Method 8: Advanced Trick – Capturing Multiple Steps with Steps Recorder
Need to document a series of actions? Windows has a hidden gem called Steps Recorder (formerly Problem Steps Recorder or PSR).
- Open Steps Recorder: Press the Windows Key, type psr.exe, and press Enter.
- Click Start Record.
- Perform the actions you want to document. Steps Recorder will automatically take a screenshot every time you click or type something significant.
- When done, click Stop Record.
- A window will appear showing all your steps with corresponding screenshots and text descriptions of your actions.
- Click Save. This will save the entire sequence as a .ZIP file containing an MHTML (.mht) file, which you can open in a web browser.
Heads Up: Microsoft is phasing out Steps Recorder in Windows 11 starting in 2024. While it might still work for a while, consider other tools like Snipping Tool with delay or third-party options for documenting steps in the future.
Where to Find Your Screenshots
If you used Win + PrtScn, go to This PC > Pictures > Screenshots.
If you used Snipping Tool, check your Pictures folder or paste from your clipboard.
Bonus Tips: Scrolling Screenshots & Including Your Mouse Pointer
- Scrolling Screenshots (Full Web Pages):
- Microsoft Edge: Use the “Web capture” feature (Ctrl + Shift + S, then select “Capture full page”).
- Firefox: Right-click on a page and select “Take Screenshot,” then choose “Save full page.”
- Chrome: The easiest way is with a browser extension like “GoFullPage.”
- Including Your Mouse Pointer:
- Most methods hide the pointer.
- The Snipping Tool (Windows 11) / Snip & Sketch (Windows 10) app has a setting to include the mouse cursor. Open the app, go to Settings (three dots menu), and look for the option.
- Third-party tools like PicPick also offer this.
Frequently Asked Questions (FAQ)
Q: Where do screenshots save automatically in Windows?
A: If you use Windows Key + Print Screen or the Xbox Game Bar, screenshots are typically saved in your Pictures > Screenshots folder (or Videos > Captures for Game Bar). Screenshots taken with Snipping Tool/Snip & Sketch need to be manually saved after capture, unless you’ve configured auto-save in its settings (a newer Win11 feature).
Q: How do I screenshot on a laptop if the Print Screen key is combined with another function?
A: You’ll likely need to press the Fn key (usually found in the bottom row of your keyboard) simultaneously with the PrtScn key and any other modifier key (like Windows Key or Alt).
Q: Can I edit my screenshots on Windows?
A: Yes! The Snip & Sketch / Snipping Tool app has basic editing features like pen, highlighter, and crop. For more advanced editing, you can paste your screenshot into Paint, Paint 3D, or third-party image editors.
Wrap Up – How to Screenshot on Windows
And there you have it! Multiple ways to capture exactly what you need on your Windows screen. Experiment with these methods to find your favorites. Happy screenshotting!
Do you have another favorite way to screenshot on Windows? Share your tips in the comments below!
IT Security / Cyber Security Experts.
Technology Enthusiasm.
Love to read, test and write about IT, Cyber Security and Technology.
The Geek coming from the things I love and how I look.