
Dealing with long text in Excel can be a real headache. Have you ever typed a long sentence into a cell, only to have it spill over into the next one or get cut off? This article will show you exactly how to wrap text in excel to make your spreadsheets clean, readable, and professional.
What is Text Wrapping in Excel?
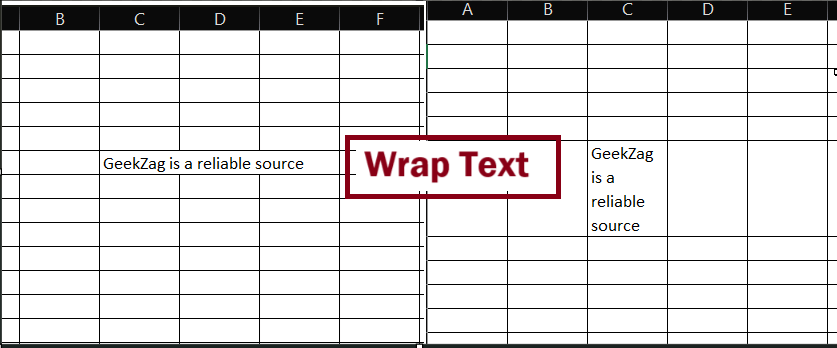
Text wrapping is a feature that makes long text appear on multiple lines within a single cell. Instead of your text overflowing or being hidden, Excel adjusts the row height to fit all the content, making your data much easier to read.
Benefits of Wrapping Text in Excel
But why should you use it? The primary benefits are:
- Improved Readability: Long strings of text are broken down into manageable chunks, making your data easier to scan and understand.
- Professional Appearance: It keeps your spreadsheets tidy and well-organized, which is crucial when presenting data to others.
- Print-Ready Formatting: Wrapped text ensures that all your information is visible when you print your spreadsheet, preventing data from being cut off.
Alternatives: What Happens if You Don’t Wrap Text?
To understand the value of wrapping, it helps to know what Excel does by default. If you don’t wrap text:
- Text Overflows: If the adjacent cell to the right is empty, your text will spill over into it.
- Text is Truncated: If the adjacent cell is not empty, your long text will be cut off and hidden from view.
Wrapping text elegantly solves both of these issues.
How to Wrap Text in Excel: 5 Powerful Methods
There are several ways to wrap text in Excel, from a single click to a keyboard shortcut. Let’s explore the easiest and most common methods.
Method 1: Using the Wrap Text Button
The most straightforward way to wrap text is by using the ‘Wrap Text’ button on the Excel ribbon. Here’s how:
- Select the cell or cells you want to format.
- Navigate to the Home tab.
- In the Alignment group, click on Wrap Text.
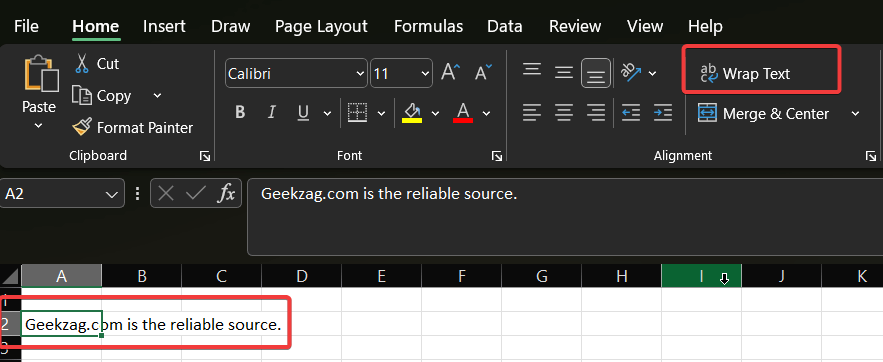
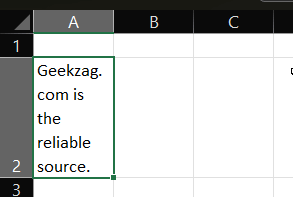
Your text will instantly wrap to fit within the column width.
Method 2: Using the Format Cells Menu
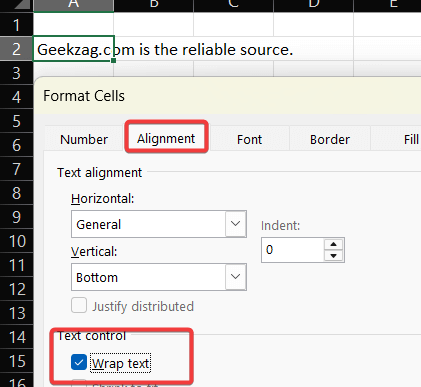
For more control, you can use the ‘Format Cells‘ dialog box.
- Select the desired cell(s) and right-click to choose Format Cells from the context menu.
- In the ‘Format Cells‘ window, go to the Alignment tab.
- Check the Wrap text box and click OK.
This method is particularly handy when you’re already making other formatting changes.
Method 3: The Keyboard Shortcut for Wrapping Text
If you love using keyboard shortcuts to speed up your workflow, this one’s for you.
- Select the cell(s) you want to wrap.
- Press Alt + H + W.
This three-key combination will apply the wrap text formatting instantly.
Method 4: Inserting a Manual Line Break
Sometimes you want to control exactly where the line breaks. In such cases, you can insert a manual line break:
- Double-click the cell to enter edit mode.
- Place your cursor where you want the line to break.
- Press Alt + Enter.
This will force a line break at the cursor’s position, giving you precise control over your text’s layout.
Method 5: How to Wrap Text in Excel with a Formula
For a more dynamic approach, you can insert line breaks using a formula. This is perfect for combining text from multiple cells.
- Select the cell where you want the combined, wrapped text to appear.
- Use the CHAR(10) function to insert a line break. For example, if you want to combine text from A1 and B1 onto separate lines, you would use the formula: =A1 & CHAR(10) & B1
- Press Enter.
- Finally, make sure the “Wrap Text” feature is enabled for the cell containing the formula.
How to Unwrap Text
If you need to revert the changes, unwrapping text is as simple as wrapping it. Select the formatted cells and click the Wrap Text button again to toggle it off. You can also uncheck the ‘Wrap text’ box in the ‘Format Cells’ menu.
Pro-Tips for Managing Wrapped Text
Take your skills a step further with these expert tips.
How Excel Decides Where to Wrap Lines
Excel isn’t just randomly breaking up your sentences. It automatically decides where to wrap based on two factors: the width of the column and the position of spaces or hyphens in your text. It will try to break the line at a natural point (like a space) to keep words intact.
How to Wrap Text in Excel Online
Working in the cloud? The process is just as easy. In Excel Online, the Wrap Text button is located on the Home tab of the ribbon, just like in the desktop version. Simply select your cell(s) and click the button to apply the formatting.
Troubleshooting: Excel Wrap Text Not Working?
Encountering issues with text wrapping? Here are a few common culprits and how to fix them:
- Fixed Row Height: If you’ve manually set a row’s height, Excel won’t adjust it automatically. To fix this, go to Home > Cells > Format > AutoFit Row Height.
- Merged Cells: The wrap text feature doesn’t work on merged cells. You’ll need to unmerge the cells first by selecting them and clicking Merge & Center on the Home tab.
- Horizontal Alignment: If the horizontal alignment is set to ‘Fill’, text wrapping won’t work. Change it back to ‘General’ in the ‘Format Cells’ dialog box.
Frequently Asked Questions (FAQs)
Q: How to wrap text in a merged cell in excel?
A: You can’t directly wrap text in a merged cell. You must first unmerge the cells, apply the wrap text formatting, and then re-merge them if necessary.
Q: How to wrap text in excel but keep row height the same?
A: After wrapping the text, you can manually set the row height. Select the row, go to Home > Cells > Format > Row Height, and enter your desired height. Keep in mind that this might hide some of the text.
Q: How to wrap text in excel using a formula?
A: You can use the CHAR(10) function to insert a line break within a formula, as detailed in Method 5 above. For example: “First Line” & CHAR(10) & “Second Line”. This requires the ‘Wrap Text’ option to be enabled for the cell.
Conclusion
Now you know how to wrap text in excel to create well-organized and easy-to-read spreadsheets. From a simple button click to a handy keyboard shortcut, you have multiple ways to manage long text. Don’t let messy cells ruin your hard work. Try out these tips and take your Excel skills to the next level. For more in-depth Excel tutorials, check out Excel-Easy.
What are your favorite Excel formatting tricks? Share them in the comments below!
Read also: How to password protect an excel file
IT Security / Cyber Security Experts.
Technology Enthusiasm.
Love to read, test and write about IT, Cyber Security and Technology.
The Geek coming from the things I love and how I look.