

Struggling with an unwanted keyboard layout cluttering your language bar? You’re not alone. It’s a common frustration when you remove keyboard language option windows seems impossible. This guide provides simple, step-by-step methods to reclaim control, even tackling the dreaded grayed-out “Remove” button and stopping pesky keyboards from reappearing.
- Why Do I Have Multiple Keyboard Layouts?
- Understanding the Difference: Input Language vs. Keyboard Layout
- How to Remove Keyboard Language Option Windows 11 & 10 (Complete Guide)
- Troubleshooting: When the ‘Remove’ Button is Grayed Out
- The Ultimate Fix: Stop Keyboard Layouts from Coming Back
- Bonus Tip: Avoid Accidental Keyboard Switching
- Frequently Asked Questions (FAQ)
Why Do I Have Multiple Keyboard Layouts?
Before we dive in, let’s quickly cover how you ended up here. Often, extra keyboard layouts appear for one of these reasons:
- Accidental Shortcuts: Pressing Windows key + Spacebar or Alt + Shift can cycle through and sometimes add keyboard layouts without you realizing it.
- Multilingual Use: If you’ve ever added a new language to read or type in, Windows often includes its default keyboard layout automatically.
- Software and Games: Some applications, particularly games from platforms like Steam or specialized business software, can add their own required keyboard layouts during installation.
Understanding the cause helps in preventing it from happening again.
Understanding the Difference: Input Language vs. Keyboard Layout
To solve this problem effectively, it’s crucial to know what you’re removing. Users often confuse these terms:
- Display Language: This is the language you see across Windows—in menus, settings, and dialog boxes.
- Input Language: This is the language you are typing in (e.g., English, Spanish, German). You can have multiple input languages installed.
- Keyboard Layout: This refers to the physical arrangement of the keys (e.g., QWERTY, AZERTY) for a specific input language. A single input language, like English, can have multiple layouts (e.g., US, UK, International).
Your issue is almost always with an unwanted Keyboard Layout, not the entire language.
How to Remove Keyboard Language Option Windows 11 & 10 (Complete Guide)
Method 1: The Standard Way (via Windows Settings)
For most users, removing a keyboard layout is a straightforward process that takes less than a minute directly within the Windows Settings panel.
For Windows 11 Users
First, open the Settings app by pressing Windows key + I.
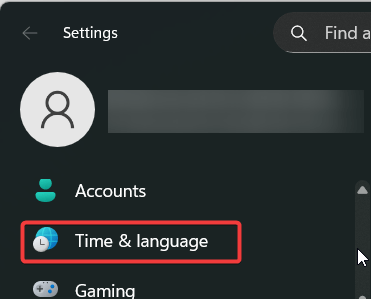
Next, navigate to Time & language > Language & region.

Click the three-dot menu (…) next to the relevant language and select Language options.


Finally, under the Keyboards section, find the layout you wish to delete, click the three-dot menu (…) next to it, and select Remove.

For Windows 10 Users
To begin, open the Settings app by pressing Windows key + I.
Then, head to Time & Language > Language.


Under Preferred languages, click the language you want to edit and then click Options.

Lastly, select the keyboard layout you want to get rid of and click the Remove button.

Troubleshooting: When the ‘Remove’ Button is Grayed Out
Sometimes, the Remove button is grayed out. This typically happens for one of two reasons:
- It’s the only layout available: Windows requires at least one keyboard per input language. If you want to remove one, you must add another one first.
- It’s tied to your Windows Display Language: If the layout is linked to the primary language of your operating system, Windows protects it from accidental removal. You can check your display language at the top of the Language & region settings page. If this is the case, you will likely need to use the advanced methods below.
Advanced Fix 1: Using PowerShell
When the standard options fail, PowerShell offers a powerful, direct command-line solution.
- Right-click the Start button and select Terminal (Admin) or Windows PowerShell (Admin).
- First, run this command to see a list of your installed layouts: Get-WinUserLanguageList
- Note the LanguageTag (e.g., “en-US”) for the layouts you want to keep.
- Next, use this command to rewrite the list with only the layouts you want, for example:codePowershell
Set-WinUserLanguageList -LanguageList en-US -Force
For more details, see the official Microsoft PowerShell Documentation.
Advanced Fix 2: Using the Registry Editor
Warning: This is for expert users. Always back up your registry before making changes by clicking File > Export.
- Press Windows key + R, type regedit, and press Enter.
- Navigate to the following key: HKEY_CURRENT_USER\Keyboard Layout\Preload
- In the right pane, you will see values corresponding to your layouts. Use Microsoft’s list of Windows Keyboard Identifiers to identify the one to remove.
- Right-click the value you want to remove and select Delete. Restart your PC.
The Ultimate Fix: Stop Keyboard Layouts from Coming Back
Have you ever removed a keyboard layout, only for it to reappear after a restart? This “ghost keyboard” is usually caused by your Microsoft Account syncing your settings across devices. Here’s how to stop it for good.
Before removing the layout, go to Settings > Accounts > Windows backup (on Windows 11) or Settings > Accounts > Sync your settings (on Windows 10).
Turn off the setting for Language preferences or Remember my preferences.


Now, proceed with one of the removal methods described above.
Once the layout is gone, you can re-enable the sync setting if you wish.
This prevents Windows from “helpfully” restoring the unwanted keyboard layout from its cloud backup.
Bonus Tip: Avoid Accidental Keyboard Switching
The most common culprit for accidentally changing keyboards is the Windows key + Spacebar shortcut. Now that you know it exists, you can be mindful of the shortcut and avoid unintentional switches.
Frequently Asked Questions (FAQ)
Q1: Why can’t I remove the default keyboard language in Windows?
You cannot remove the keyboard layout that is currently set as your primary Windows display language without first adding a new one and potentially setting it as the default. Windows requires at least one keyboard to function.
Q2: How do I change the default keyboard layout in Windows 11?
Go to Settings > Time & language > Typing > Advanced keyboard settings. Use the Override for default input method dropdown menu to select your preferred layout.
Q3: Will removing a keyboard layout delete the entire language pack?
No, it only removes the specific input method. The language pack (spelling, display text, etc.) will remain installed.
Conclusion: You’re Back in Control
Ultimately, managing your keyboard layouts doesn’t have to be a headache. From a simple click in Settings to advanced fixes for persistent “ghost” keyboards, you now have a complete toolkit to solve the problem for good. You can finally customize your Windows experience exactly how you want it.
Found this guide uniquely helpful? Share it with others who might be stuck, and leave a comment below with your success story
IT Security / Cyber Security Experts.
Technology Enthusiasm.
Love to read, test and write about IT, Cyber Security and Technology.
The Geek coming from the things I love and how I look.