
Learning how to set up a secure vpn connection windows is essential for protecting your digital privacy and accessing remote networks safely.
Whether you are securing a connection on public Wi-Fi or accessing a corporate network, this guide provides a direct, step-by-step pathway to manually configure your Windows client in minutes.
Prerequisites: Before You Start
Before diving into the configuration, you must obtain the following specific details from your VPN provider or network administrator. Windows has a built-in “Client,” but it requires a “Service” to connect to.
- Server Name or Address: (e.g., vpn.example.com or 192.168.1.50)
- VPN Type (Protocol): (e.g., IKEv2, L2TP/IPsec, or SSTP)
- Sign-in Info: Username and Password, or a Smart Card.
- Pre-shared Key: (Required if using L2TP/IPsec).
Note: For maximum security, we recommend using IKEv2 over PPTP, as the latter is outdated and less secure. IKEv2 is particularly superior for laptop users because it automatically re-establishes the connection if you switch from Wi-Fi to a mobile hotspot.
How to Set Up a Secure VPN Connection on Windows 11 & 10
Method 1: Using Windows Built-in Settings (Recommended)
The most reliable way to set up a secure vpn connection windows utilizes the modern Settings app. This interface is optimized for Windows 10 and 11 and offers the smoothest user experience.
- Step 1: Access Network Settings
First, we need to locate the VPN configuration menu.
Click on the Start button and select Settings (gear icon).
In the left-hand sidebar, click on Network & internet.
Select the VPN tab from the list on the right.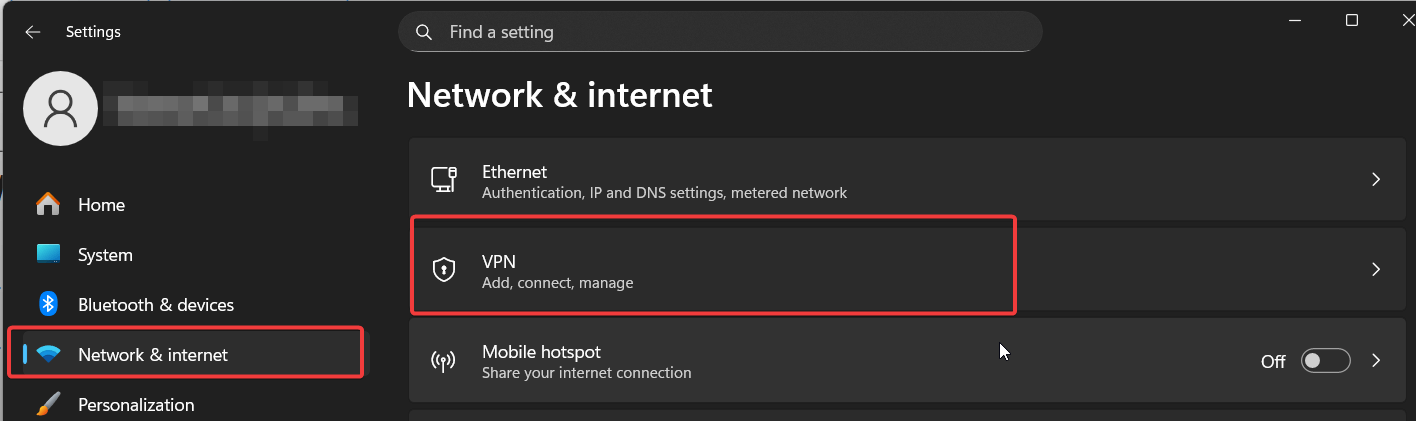
- Step 2: Add a VPN Connection
Once inside the VPN menu, you will see a list of any existing connections.
Click the prominent button labeled Add VPN.
A blue pop-up window titled “Add a VPN connection” will appear. This is where you will input your server details. - Step 3: Configure Provider and Protocols
This is the critical step where accuracy matters to avoid connection errors.
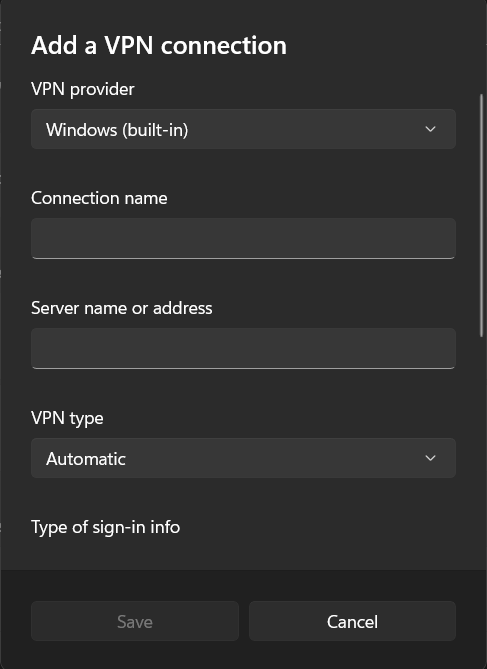
Fill out the fields as follows:
VPN Provider: Click the dropdown and select Windows (built-in).
Connection Name: Enter a recognizable name (e.g., “Work VPN” or “My Private Connection”).
Server Name or Address: Type the URL or IP address provided by your IT admin or VPN service.
VPN Type: select Automatic if you are unsure, but manually selecting IKEv2 or L2TP/IPsec with pre-shared key is faster if you know the protocol.
Type of sign-in info: Choose Username and password.
Once all fields are filled, click Save. You have now successfully created the profile.
Method 2: Using the Control Panel (Legacy)
While the Settings app is preferred, some advanced users or those on older builds may prefer the Control Panel. This method accesses the same underlying architecture.
- Press the Windows Key + R, type control, and hit Enter.
- Navigate to Network and Internet > Network and Sharing Center.
- Click on Set up a new connection or network.
- Select Connect to a workplace and click Next.
- Choose Use my Internet connection (VPN).
- Enter your Internet address (Server IP) and Destination name.
- Click Create.
For further reading on legacy configurations, you can check the official Microsoft Support documentation.
Advanced Configuration: Proxy and DNS Settings
Many basic guides skip this, but for corporate access, custom networking is often required.
After you create the connection, you may need to tweak how the VPN handles web traffic.
- Go back to Settings > Network & internet > VPN.
- Click on the connection name you just created to expand its options.
- Click Advanced Options.
- VPN Proxy Settings: If your work requires a specific proxy to access internal sites, select “Manual setup” here and enter the details.
- Edit IP Settings: By default, Windows uses DHCP. If your admin assigned you a static internal IP or specific DNS servers (to resolve internal company URLs), click “Edit” here to input them manually.
How to Connect and Disconnect
After you set up a secure vpn connection windows, you need to know how to toggle it on and off.
- Look at your taskbar (bottom right) and click the Network/Wi-Fi icon.
- Click the VPN button in the Quick Settings menu.
- Select the connection you created (e.g., “Work VPN”) and click Connect.
- If prompted, enter your username and password.
To disconnect, simply repeat the steps and click Disconnect.
Managing Connections: Editing and Deleting
If you moved offices or your server password changed, you don’t need to create a new profile.
- To Edit: Go to Settings > Network & internet > VPN, click the arrow next to your connection, and select Advanced options. Click the Edit button next to “Connection properties” to update your password or server address.
- To Delete: Click the arrow next to the connection name and simply click the Remove button. This is useful for clearing out old, unused profiles that might be causing conflicts.
Troubleshooting Common VPN Errors
Even when you follow the steps perfectly, network issues can occur. Here is how to fix the most common errors users encounter.
Error 809: The network connection could not be established
This is usually a firewall issue.
- Fix: Ensure that ports UDP 500 and UDP 4500 are open on your router if you are using L2TP/IPsec or IKEv2.
Error 691: Access was denied because the username and password are invalid
This indicates an authentication failure.
- Fix: Double-check your caps lock and ensure you are using the correct credentials. If you are using a commercial provider like NordVPN or ExpressVPN, ensure your subscription is active.
Slow Connection Speed
If your internet slows down significantly:
- Fix: Try changing the VPN Type in the settings from “Automatic” to a different protocol like IKEv2, which is generally faster and more stable on mobile networks.
Frequently Asked Questions (FAQ)
Yes, Windows 11 acts as a VPN client, meaning the software to connect is built-in. However, you still need a subscription to a VPN service (like a corporate server or a third-party provider) to actually connect to the internet securely.
While third-party apps have dedicated buttons, you can replicate this in Windows Settings. Go to your VPN profile, select Advanced Options, and look for “Allow VPN over metered networks” or usage options. For stricter control, ensure “Connect automatically” is checked.
IKEv2 is currently the industry standard for mobile and Windows users due to its ability to reconnect quickly if your internet drops. Avoid PPTP unless absolutely necessary, as it has known security vulnerabilities.
Split tunneling allows you to route some traffic through the VPN (like work emails) while letting other traffic (like Netflix or YouTube) go through your direct internet connection to improve speed.
Conclusion
Manually configuring your network settings gives you granular control over your data privacy and security.
By following this guide, you should now be able to set up a secure vpn connection windows without relying on third-party software installers. Remember to keep your Windows installation updated to ensure you have the latest security patches for your protocols.
If you found this guide helpful, share it with your team or drop a comment below if you are facing specific error codes!
Key Takeaways
- Requires External Service: Windows has a built-in client, but you must have a server address and credentials from a provider or IT admin to connect.
- Preferred Method: Use Settings > Network & internet > VPN for the most stable configuration on Windows 11.
- Best Protocol: Select IKEv2 for superior security and automatic reconnection on unstable networks; avoid the outdated PPTP.
- Troubleshooting: If the connection fails (Error 809), check that firewall ports UDP 500 and UDP 4500 are open.
IT Security / Cyber Security Experts.
Technology Enthusiasm.
Love to read, test and write about IT, Cyber Security and Technology.
The Geek coming from the things I love and how I look.