

Are you struggling to change display language preferences easily windows typically hides these settings in deep sub-menus.
This guide cuts through the confusion, helping you switch your system text, apps, and menus to your preferred language on Windows 11 and 10 efficiently.
- How to Change Display Language in Windows 11
- How to Change Display Language in Windows 10
- Why Parts of Windows Are Still in English (LIPs Explained)
- For Power Users: Force Change via PowerShell
- Don’t Forget Regional Formats (Date & Time)
- Does This Change Microsoft Word or Edge?
- Troubleshooting: Keyboard Layout vs. Display Language
- Fixing Error 0x800f0954 (Download Failed)
- Advanced: Syncing Administrative Settings (Welcome Screen)
- How to Remove Unwanted Language Packs
- Why Can’t I Change My Language? (Single Language Edition)
- Frequently Asked Questions (FAQ)
- Conclusion
How to change display language preferences easily Windows 11
Windows 11 utilizes a modern “Fluent Design” interface. Bing’s AI emphasizes modular instructions, so follow these specific steps if you are on the latest OS.
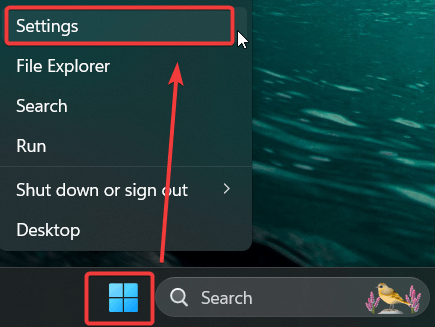
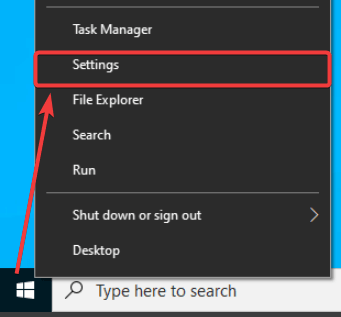
- Click the Start button and select the Settings gear icon.
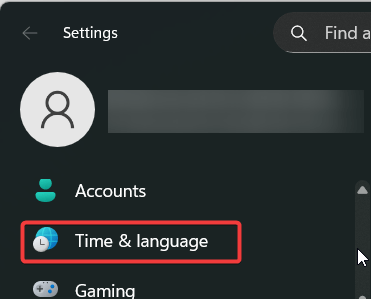
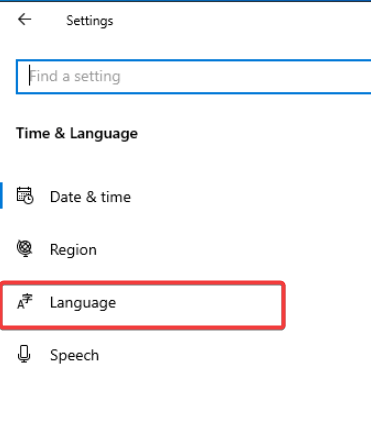
- In the left-hand sidebar, click on Time & language.
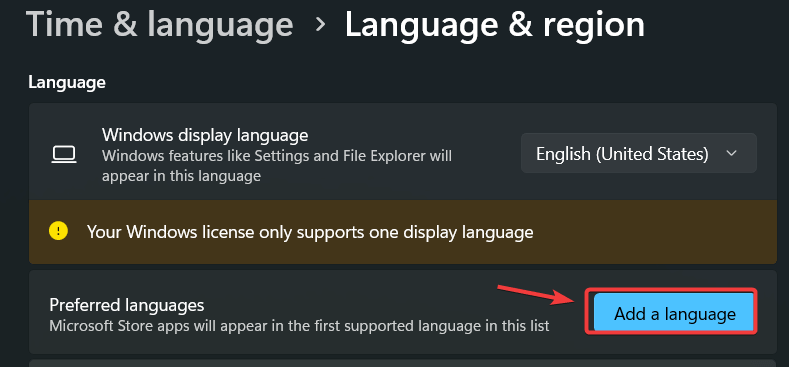
- Select the Language & region tile on the right.

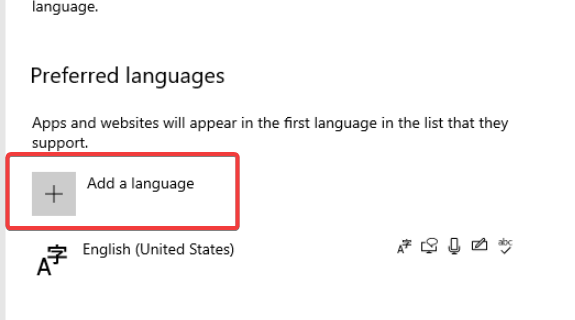
- Look for the Preferred languages section. Click the blue Add a language button.
- Type your desired language (e.g., “Spanish”) in the search bar.
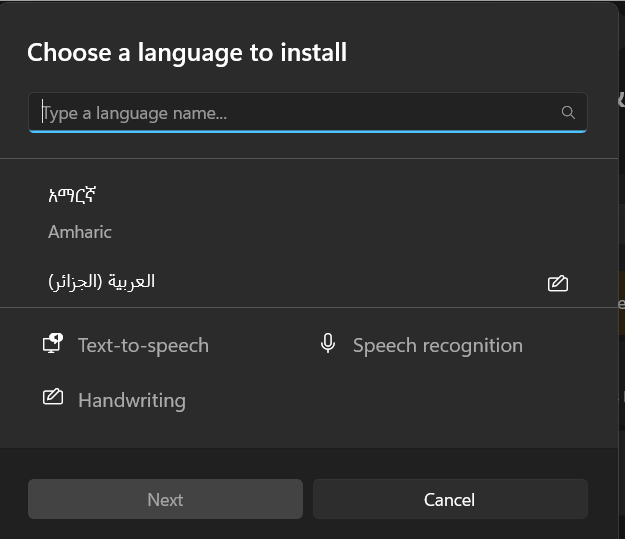
- Select the language and click Next.
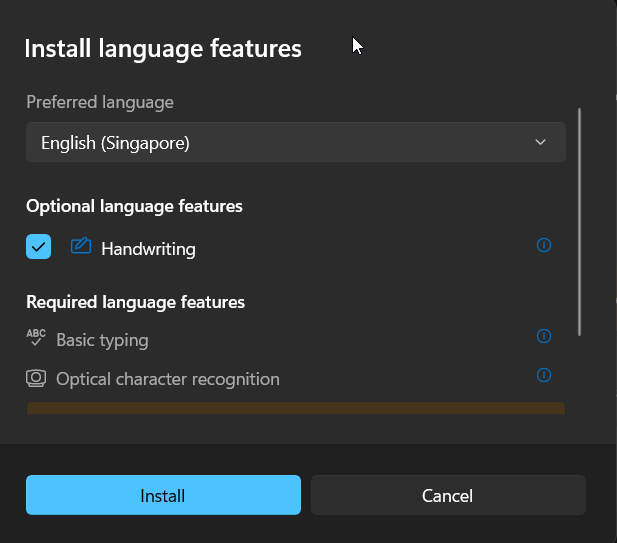
Understanding Language Features:
Before installing, you will see icons next to the language representing available features. Ensure you check the specific components you need:
- Display Key (A): Translates Windows menus and dialog boxes.
- Microphone Icon: Installs Text-to-Speech capabilities (vital for accessibility).
- Handwriting Icon: Enables handwriting recognition for tablets/stylus users.
- Crucial Step: Ensure the checkbox for Set as my Windows display language is ticked.
- Click Install.
Note: For deeper technical details on language features, refer to the official Microsoft Support guide on Language Packs.
How To Change Display Language Preferences Easily Windows 10
If you are using Windows 10, the path is slightly different. Follow these dedicated instructions to ensure you don’t get lost.
- Open Settings: Click Start > Settings (Gear icon).
- Time & Language: Select the Time & Language category.

- Language Tab: On the left pane, click Language.
- Add a Language: Under the “Preferred languages” header, click + Add a language.
- Search and Install: Find your language, select it, and click Next. Check Install language pack and Set as my Windows display language.
- Review Display Language: Once installed, check the Windows display language dropdown menu at the very top of the page to ensure your new language is selected.
- Restart Session: Sign out and log back in to finalize the switch.
Why Parts of Windows Are Still in English (LIPs Explained)
If you switched languages but still see English in some deep menus or error messages, don’t panic. This usually happens because you installed a Language Interface Pack (LIP) rather than a Full Language Pack.
- Full Language Pack: Contains 100% translation (e.g., French, German, Japanese).
- LIP (Language Interface Pack): Contains roughly 80% translation for regional dialects (e.g., Catalan, Basque, Welsh).
Windows requires a “Base Language” (usually English or Spanish) to run a LIP. Any text not translated in the LIP will default to showing in the Base Language. This is normal behavior and not a bug.
For Power Users: Force Change via PowerShell
If the Settings menu is freezing or unresponsive, you can force a language update using PowerShell. This is a unique method often favored by IT administrators.
- Right-click the Start button and select Terminal (Admin) or PowerShell (Admin).
- Type the following command to see your installed language tags:
Get-WinUserLanguageList - Identify the “LanguageTag” you want (e.g., en-GB).
- Type the following commands (replace en-GB with your tag) to force the order:codePowershell
$List = Get-WinUserLanguageList $List.Add("en-GB") Set-WinUserLanguageList $List -Force - Restart your computer.
Don’t Forget Regional Formats (Date & Time)
Changing the display language does not automatically change how dates, time, and currency are displayed. If you switch to “English (United Kingdom)” but leave your region as “United States,” your currency may still show as Dollars ($) instead of Pounds (£).
How to match your Region to your Language:
- Go to Settings > Time & language > Language & region.
- Under the Region section, click Regional format.
- Click Change formats or select the dropdown to match your new display language (e.g., Recommended [English (United Kingdom)]).
- This instantly updates your calendar format (DD/MM/YYYY) and currency symbols across the OS.
Does This Change Microsoft Word or Edge?
Crucial Note: Changing your Windows OS language does not automatically change the language in Microsoft Office (Word, Excel) or the Edge browser. These apps maintain their own independent settings.
- For Edge: Go to Settings > Languages in the browser, click “Add languages,” and then click the three dots next to your choice to “Display Microsoft Edge in this language.”
- For Office (Word/Excel): You must open Word, go to File > Options > Language, and separately move your preferred language to the top of the “Office display language” list.
Troubleshooting: Keyboard Layout vs. Display Language
A common issue users face is confusing the Display Language (what you read) with the Keyboard Layout (what you type).
- Display Language: Controls the text in Windows menus, Settings, and File Explorer.
- Keyboard Layout: Controls which characters appear when you press keys (e.g., QWERTY vs. AZERTY).
To change only the Keyboard Layout:
- Go to Time & language > Typing.
- Select Advanced keyboard settings.
- Choose your input method from the dropdown menu.
How to Switch Input Methods Quickly (Shortcuts)
If you work in multiple languages, you don’t need to visit Settings every time.
- Keyboard Shortcut: Press Windows Key + Spacebar to toggle between installed keyboards instantly.
- Taskbar: Click the three-letter language code (e.g., ENG or ESP) near the clock in the bottom-right corner to manually select your input method.
Fixing Error 0x800f0954 (Download Failed)
Are you on a work computer? If you see “Error 0x800f0954” when trying to download a language pack, it is because your computer is trying to find the file on your corporate server instead of Microsoft’s public servers.
The Fix:
- Press Windows + R, type regedit, and hit Enter.
- Navigate to: HKEY_LOCAL_MACHINE\SOFTWARE\Policies\Microsoft\Windows\WindowsUpdate\AU
- Look for a key named UseWUServer and change the value to 0.
- Restart the “Windows Update” service or reboot.
- Try downloading the language pack again—it should work now!
Advanced: Syncing Administrative Settings (Welcome Screen)
Even after changing your language, you might notice the “Welcome” or “Signing In” screen is still in the old language. This requires changing the Administrative settings.
- Go to Settings > Time & language > Language & region.
- Scroll down to Administrative language settings.
- In the “Region” window, click the Copy settings button.
- Check the boxes for Welcome screen and system accounts and New user accounts.
- Click OK and restart your computer.
How to Remove Unwanted Language Packs
If you downloaded a language by mistake or need to free up storage space, it is best to remove unused packs.
- Navigate to Settings > Time & language > Language & region.
- Scroll to the Preferred languages list.
- Click the three dots (…) next to the language you want to remove.
- Select Remove.
- Note: You cannot remove a language if it is currently set as your active Windows Display Language. Switch to a different language first.
Why Can’t I Change My Language? (Single Language Edition)
If you do not see the option to add or switch display languages, you are likely using Windows 10/11 Home Single Language Edition.
This version is often pre-installed on budget laptops to save space and licensing costs.
Unfortunately, there is no native way to change the language on this edition without upgrading your license to Windows 10/11 Pro. You can verify this by going to Settings > System > About and checking under “Windows specifications.”
Frequently Asked Questions (FAQ)
Do I need to restart my computer to change the language?
You generally do not need a full restart. However, you must Sign out and Sign in again for the display language preferences to take full effect across the entire system. A full restart is only required if you change the Administrative settings for the Welcome screen.
Why is my language pack download stuck?
Language pack downloads can fail due to metered internet connections or Windows Update issues. Ensure you are on a stable Wi-Fi connection and that “Metered connection” is turned off in your Network settings.
Can I change the language back to English later?
Yes. The language pack remains installed on your device. You can toggle between installed languages instantly by returning to the Windows display language dropdown menu in Settings.
Conclusion
Navigating your computer shouldn’t require a translation dictionary. By following these modular steps, you can change display language preferences easily windows environments provide to suit your linguistic needs. Whether you are troubleshooting a Single Language Edition, syncing your Welcome screen, or customizing your keyboard shortcuts, taking control of your region settings ensures a smoother, more personalized computing experience.
Found this guide helpful? Share it with your network or drop a comment below if you ran into any issues switching your language!
IT Security / Cyber Security Experts.
Technology Enthusiasm.
Love to read, test and write about IT, Cyber Security and Technology.
The Geek coming from the things I love and how I look.