
Learning how to password protect an excel file is a critical skill for anyone handling sensitive or confidential data. Whether you’re working with financial records, personal information, or proprietary business data, securing your spreadsheets is paramount.
This comprehensive guide will walk you through various methods to protect your Microsoft Excel workbooks and worksheets, ensuring your information remains secure. Furthermore, we’ll cover how to remove protection and address important considerations.
Method 1: Encrypting an Entire Excel Workbook (Password to Open)
This method provides the most robust protection, as it requires a password simply to open and view the contents of the Excel file.
Consequently, it’s ideal for highly sensitive documents.
Steps to Encrypt Your Excel Workbook:
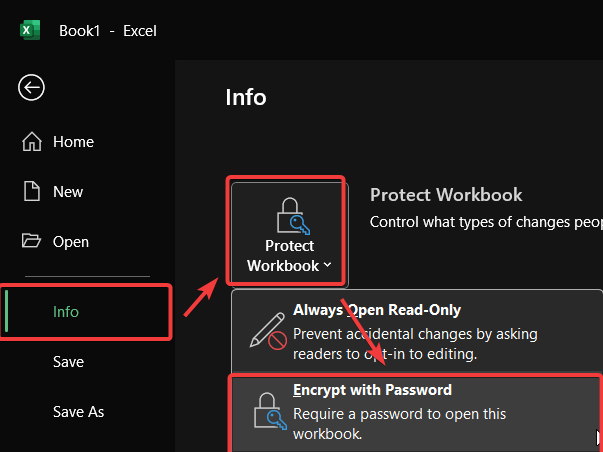
- First, open the Excel file you wish to protect. Then, click on the File tab located in the top-left corner of the Excel ribbon.
- Next, select Info from the menu options on the left-hand side.
- Subsequently, click on the Protect Workbook button. This will reveal a dropdown menu with several protection options.
- From the dropdown menu, choose Encrypt with Password.
- An “Encrypt Document” dialog box will appear. Here, enter your desired password and then click OK.
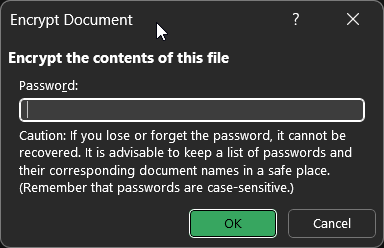
- Tip: For robust security, create a strong password combining uppercase and lowercase letters, numbers, and symbols. Microsoft offers guidance on creating strong passwords.
- You will then be prompted to re-enter the password in the “Confirm Password” dialog box. Do so, and click OK. This ensures you’ve typed it correctly.
- Finally, save your Excel file (Ctrl + S or File > Save) to apply the encryption. The “Info” section will now indicate that the workbook is protected.
Important Note: Microsoft cannot retrieve forgotten passwords for encrypted files. Therefore, ensure you store your password in a secure location or use a reliable password manager.
Method 2: Protecting an Excel Worksheet (Preventing Edits)
Sometimes, you might want others to view a worksheet but not make any changes. In this case, protecting the worksheet itself is the appropriate action.
Steps to Protect an Excel Worksheet:
- Initially, open your Excel workbook and select the specific worksheet tab at the bottom that you intend to protect.
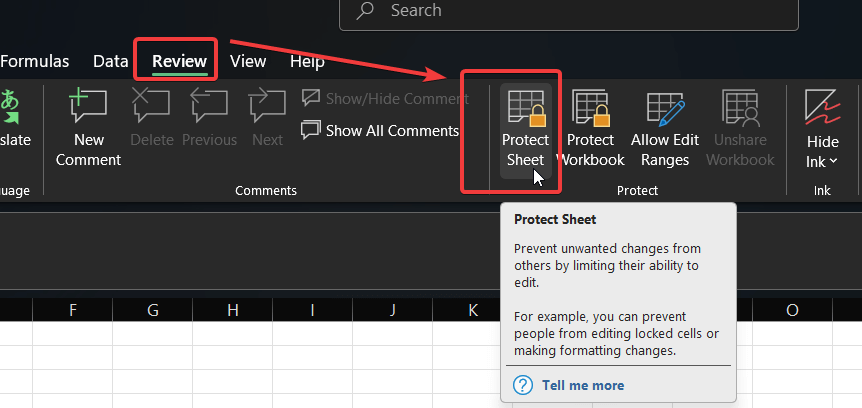
- Then, navigate to the Review tab on the Excel ribbon.
- Within the “Protect” group on the Review tab, click on “Protect Sheet“.
- The “Protect Sheet” dialog box will open. Here, you can (optionally) enter a password that will be required to unprotect the sheet later.
- Below the password field, you’ll see a list of actions that users are allowed to perform on the protected sheet. By default, only selecting locked and unlocked cells is permitted. You can check or uncheck boxes according to your needs (e.g., allow formatting cells, inserting hyperlinks). After making your selections, click OK.
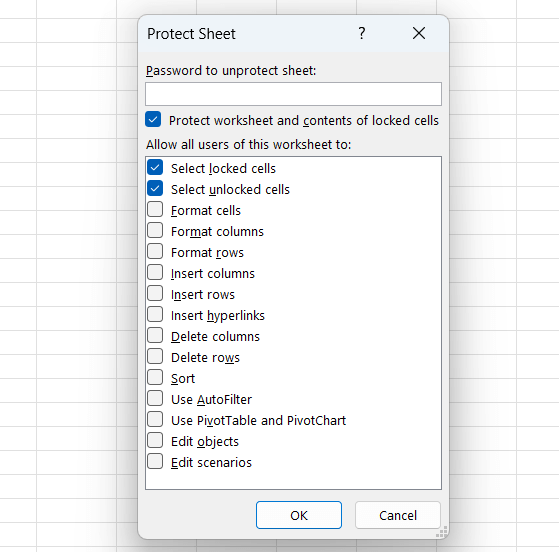
- If you entered a password in the previous step, Excel will prompt you to re-enter it for confirmation. Do so and click OK.
Your worksheet is now protected against unwanted modifications, while the rest of the workbook remains accessible as defined.
Method 3: Setting a Password to Modify (Allow Read-Only Access)
This option allows users to open and view the file without a password but requires one if they attempt to make and save changes.
It’s a good middle-ground for collaborative documents where you want to control who makes edits.
Steps to Set a Password to Modify:
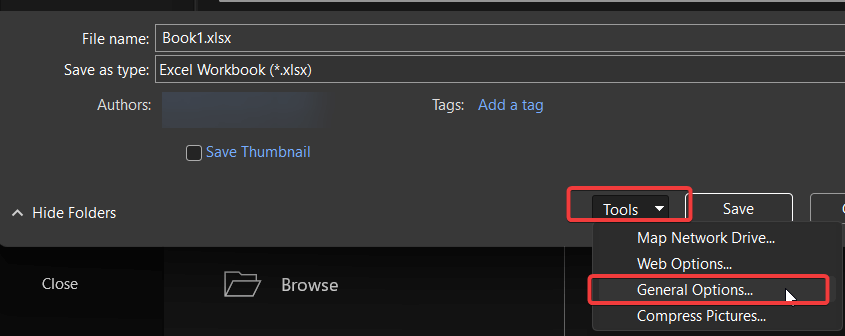
- With your Excel file open, click on the File tab.
- Select Save As. Even if you are overwriting the existing file, this route provides access to the necessary options.
- Choose the location where you want to save your file.
- In the “Save As” dialog box, look for the Tools dropdown menu, typically located next to the “Save” button. Click on it.
- From the Tools dropdown, select General Options.
- The “General Options” dialog box will appear. Here, you can enter a password in the “Password to modify” field. You can also, if desired, set a “Password to open” here for an additional layer of security. After entering your password(s), click OK.
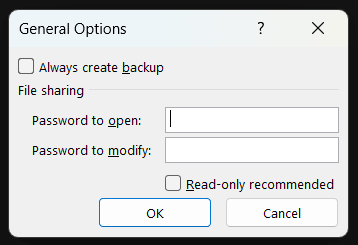
- You will be prompted to re-enter the “Password to modify” for confirmation. Do this and click OK. If you also set a “Password to open,” you’ll confirm that too.
- Lastly, click Save in the “Save As” dialog box to save the file with the new protection settings.
Now, when someone opens the file, they will be prompted to enter the “Password to modify” or open it as read-only.
How to Remove Password Protection from an Excel File
Removing password protection is generally straightforward, provided you know the existing password.
Removing “Encrypt with Password” (Password to Open):
- Open the Excel file by providing the current password.
- Go to File > Info > Protect Workbook > Encrypt with Password.
- In the “Encrypt Document” dialog box, delete the password (leave the field blank).
- Click OK and then Save the file.
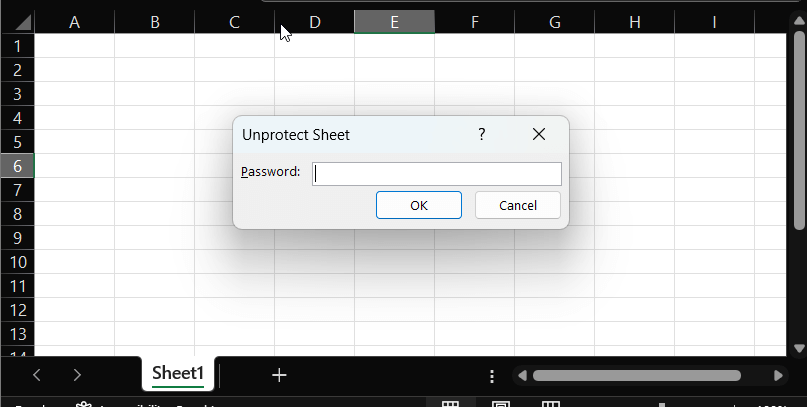
Removing Sheet Protection:
- Navigate to the protected worksheet.
- Go to the Review tab and click Unprotect Sheet.
- If prompted, enter the password and click OK.
Removing “Password to Modify”:
- Open the file (you might need the “Password to open” if also set). If prompted for the “Password to modify,” you can enter it or choose “Read Only” for now.
- Go to File > Save As.
- In the “Save As” dialog box, click Tools > General Options….
- Delete the password from the “Password to modify” field.
- Click OK, then Save the file (you may need to confirm replacing the existing file).
Important Considerations for Excel Password Protection
While password protection is a valuable feature, keep these points in mind:
- Forgotten Passwords: As emphasized, Microsoft cannot retrieve passwords for encrypted files. Losing the password means losing access to the file.
- Password Strength: Use strong, unique passwords that are difficult to guess. Avoid common words or easily identifiable information.
- Not Unbreakable: Standard Excel password protection can be vulnerable to password recovery tools, especially for older Excel formats (.xls). The encryption in modern Excel formats (.xlsx) is significantly stronger, particularly when a robust password is used for “Encrypt with Password.” For highly sensitive data needing maximum security, consider Microsoft Information Protection solutions if available in your organization.
- Always Save: Remember to save your Excel file after applying or removing any protection settings for the changes to take effect.
- Communicate Passwords Securely: If you need to share a password-protected file and its password, use a secure method to transmit the password separately from the file.
Frequently Asked Questions (FAQ)
Q1: Can I protect only specific cells in an Excel sheet?
- A: Yes. Before protecting the sheet (Method 2), select the cells you want users to be able to edit. Right-click, choose “Format Cells,” go to the “Protection” tab, and uncheck “Locked.” Then, protect the sheet. By default, all cells are locked.
Q2: Will these methods work on Excel for Mac?
- A: Yes, the principles are the same, though the exact menu locations might vary slightly. For instance, password options on Mac are often found under File > Passwords… or via the Review tab for sheet protection, and in the “Save As” dialog options.
Q3: What’s the difference between protecting a workbook (encrypting) and protecting a worksheet?
- A: Protecting a workbook (encrypting with a password to open) locks the entire file; it cannot be opened without the password. Protecting a worksheet, on the other hand, only prevents changes to that specific sheet within an already opened workbook. Users can still open the file and view other unprotected sheets.
Secure Your Data Today
Protecting your Excel files is a vital step in safeguarding your valuable information.
By utilizing the methods outlined—encrypting the entire workbook, protecting individual worksheets, or setting a password to modify—you can confidently control access and prevent unauthorized changes.
Remember to choose strong passwords and manage them wisely.
Now that you know how to password protect an excel file, take a moment to apply these techniques to your important spreadsheets. Which method do you find most useful for your needs? Share this guide with colleagues who might benefit, and feel free to leave any questions or your own tips in the comments below!
Read also: How to merge Excel data into Word
IT Security / Cyber Security Experts.
Technology Enthusiasm.
Love to read, test and write about IT, Cyber Security and Technology.
The Geek coming from the things I love and how I look.