

Learning how to insert a check box in word can be confusing because there are two distinct types: interactive boxes for digital forms and static symbols for printed lists.
Whether you need a clickable toggle or a simple visual bullet point, this guide covers every method to perfect your document.
How to Insert a Check Box in Word
Method 1: How to Insert a Clickable Checkbox (For Digital Forms)
If you are creating a survey or a form that users will fill out on their computer, you must use the Check Box Content Control. This feature is hidden by default inside the Developer tab.
Step 1: Enable the Developer Tab
Before adding the box, you must unhide the advanced tools in the Word ribbon.
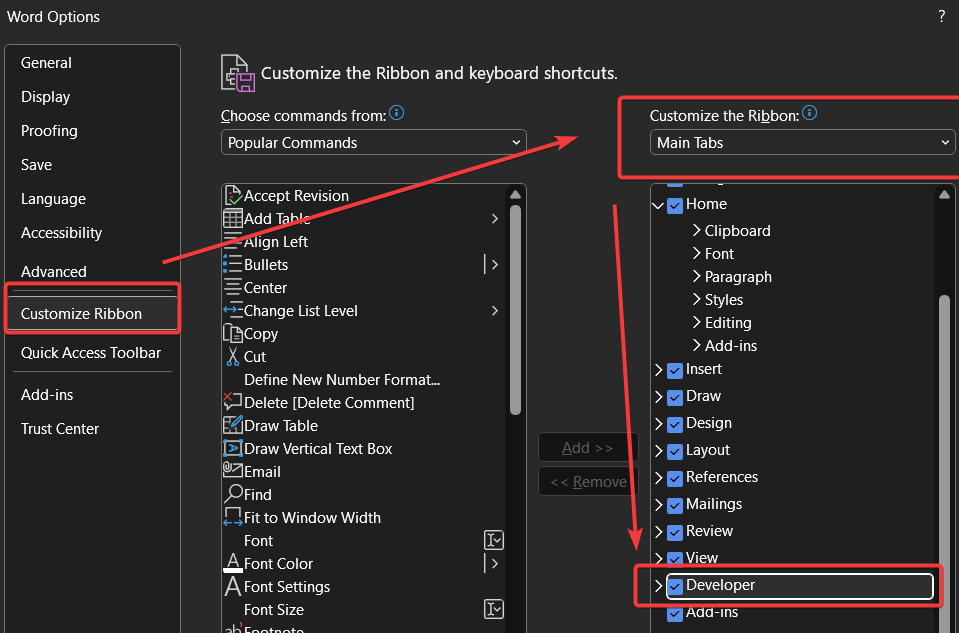
- Open Microsoft Word and click the File tab.
- Select Options at the very bottom of the menu.
- In the dialog box, click Customize Ribbon on the left sidebar.
- In the right-hand column (Main Tabs), verify that Developer is checked.
- Click OK. You will now see a new Developer tab at the top of your screen.
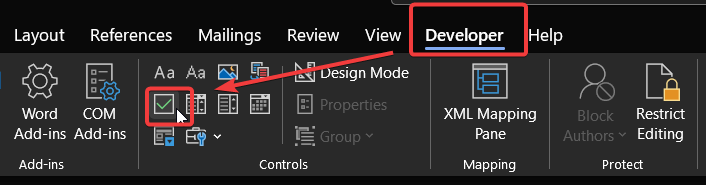
Step 2: Insert the Checkbox
Now that the tools are active, you can insert the interactive element.
- Place your cursor where you want the checkbox to appear.
- Go to the Developer tab.
- Look for the Controls section.
- Click the Check Box Content Control icon (it looks like a blue checkmark inside a square).
- The box will appear. You can click it to toggle an “X” mark inside.
Step 3: Change the “X” to a Checkmark (Optional)
By default, Word puts an “X” in the box when clicked. Most users prefer a traditional checkmark.
- Click on your newly inserted checkbox to select it.
- On the Developer tab, click Properties in the Controls group.
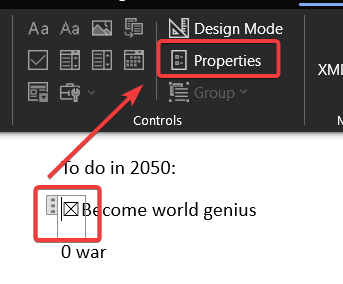
- Look for the “Checked symbol” section and click Change…

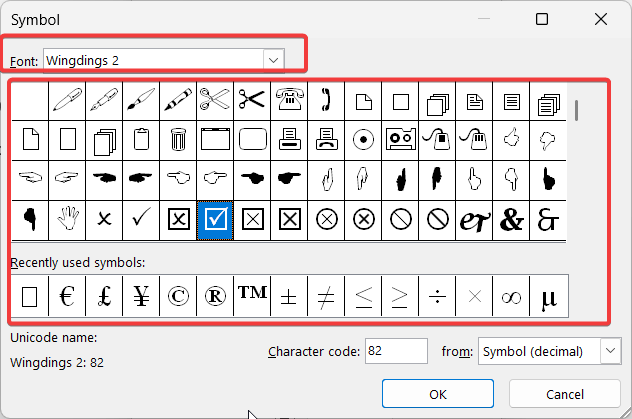
- In the font dropdown, select Wingdings 2 or Segoe UI Symbol.
- Select the checkmark icon you prefer and click OK twice.
Expert Tip: Making Checkboxes Accessible (Crucial)
Most tutorials overlook this, but if you are distributing this form in a corporate or public environment, your checkboxes must be readable by screen readers (for visually impaired users).
- Select the checkbox you just created.
- Click Properties in the Developer tab.
- In the Title and Tag fields, enter a descriptive name (e.g., “Terms of Service Consent”).
Without this tag, screen readers often skip over the box entirely, making your form unusable for some audiences.
Alternative: Using Legacy Form Tools (For Older Word Versions)
If you are sending a file to users who might be on very old versions of Word (Word 97-2003), or if Content Controls aren’t working with your specific macros, use Legacy Tools.
- Navigate to the Developer tab.
- Click the Legacy Tools icon (looks like a briefcase) in the Controls group.
- Under Legacy Forms, select the Check Box Form Field.
- Important: Legacy checkboxes will not work unless you lock the form. Click Restrict Editing > Allow only this type of editing > Filling in forms > Yes, Start Enforcing Protection.
Method 2: How to Insert a Checkbox Symbol (For Printed Lists)
If you are printing your document, you do not need complex content controls. You can simply use a bullet point formatted to look like a box. This is lighter on formatting and easier to manage for simple lists.
Using the Bullets Menu (Wingdings)
- Type your list of items (e.g., “Buy Milk”, “Walk Dog”).
- Highlight the list.
- Go to the Home tab.
- Click the small arrow next to the Bullets icon (not the numbered list).
- Select Define New Bullet…
- Click the Symbol button.
- In the Font dropdown menu, select Wingdings 2 (or just Wingdings).
- Scroll until you find a square box (character code 163 in Wingdings 2 is a popular choice).
- Click OK and then OK again.
Your list now features square boxes that are perfect for checking off with a pen after printing.
Method 3: The “Keyboard Shortcut” Hack
For power users who just want a single static checkbox without navigating menus, you can use a hexadecimal code.
- Place your cursor where you want the box.
- Type the code 2610.
- Immediately press Alt + X on your keyboard.
- The number 2610 will instantly transform into a square ballot box (☐).
- Note: To get a checked box symbol, type 2611 and press Alt + X (☑).
Pro Tip: How to Align Checkboxes Perfectly
One of the biggest frustrations with checkboxes is keeping them aligned with your text. The professional way to solve this is by using Invisible Tables.
- Go to Insert > Table and choose a 2-column table.
- Insert your checkboxes in the left column (resize it to be narrow).
- Type your text in the right column.
- Highlight the entire table, go to the Table Design tab, and set Borders to No Border.
This keeps your checkboxes perfectly straight, regardless of the text length.
Advanced: Strikethrough Text When Checked
Many users ask, “How do I make the text cross itself out when I click the box?”
Word does not do this natively. It requires a small piece of VBA (Visual Basic) code.
- Insert your checkbox using Method 1.
- Press Alt + F11 to open the Visual Basic editor.
- You will need to run a script that detects the “OnExit” event of the checkbox.
Note: This is an advanced technique. For most users, we recommend manually applying the Strikethrough formatting (strikethrough button in the Home tab) after checking the box.
How do I stop users from editing the text next to the checkbox?
To create a professional form where users can only click the boxes but not change the text:
- Select your entire document (Ctrl + A).
- Go to the Developer Tab and click Restrict Editing.
- Check “Allow only this type of editing in the document.”
- Select Filling in forms from the dropdown menu.
- Click Yes, Start Enforcing Protection.
Frequently Asked Questions
Why can’t I check the box in Word?
If you used Method 2 (Bullets), the box is just a text symbol and cannot be clicked. If you used Method 1 and it still won’t check, Design Mode might be active. Go to the Developer tab and ensure Design Mode is deselected.
Does this work in Word Online (Web Version)?
No. The Content Controls (clickable boxes) do not currently function in Word for the Web (browser version). For web-based documents, you must use Method 2 (Bullet Symbols) or Method 4 (Emojis) to create a visual checklist.
How do I delete a checkbox?
If you used Method 1 (Content Control), click the box border so it turns dark grey, then press Delete or Backspace. If you used Method 2 (Bullets), simply click the standard “Bullets” button in the Home ribbon to toggle the list off.
Can I insert a checkbox in Word for Mac?
Yes, but the interface differs slightly. You still need to enable the Developer tab by going to Word > Preferences > Ribbon & Toolbar and checking “Developer.” Once enabled, the Check Box Content Control works similarly to the Windows version.
Conclusion
Mastering how to insert a check box in word ultimately depends on your end goal: use the Developer Tab for professional, clickable digital forms, use Wingdings bullets for quick, printable checklists, or rely on legacy tools for older versions. By applying the right method, you ensure your document is both functional and user-friendly.
Did this guide help you format your document? Share this post with your colleagues or let us know in the comments if you prefer using legacy form tools!
IT Security / Cyber Security Experts.
Technology Enthusiasm.
Love to read, test and write about IT, Cyber Security and Technology.
The Geek coming from the things I love and how I look.